Internet of Things
Motivation for the Project
Residents of Missoula, Montana, understand that wildfire season can have a negative impact on air quality, but I think that most Missoulians would be surprised to learn that Missoula air ranks as the twelfth most polluted nationwide, at least in terms of short-term particle pollution. The World Health Organization (WHO) has identified air pollution as one of the greatest environmental risks to human health, leading to 4.2 million premature deaths worldwide since 2016. Air quality impacts human health primarily via particulate matter and ozone. This project focuses on particulate matter, which can be classified as coarse particulate matter (PM10) or fine particulate matter (PM2.5). Coarse particles measure larger than 10 microns and are responsible for causing respiratory discomfort and inflammation, but unlike fine particulate matter (particles measuring less than 2.5 microns), they do not enter the bloodstream and cause systemic inflammation. The WHO has issued guidance on both PM10 and PM2.5 concentrations suggesting that municipalities strive to limit PM2.5 concentrations to below 15 micrograms per cubic meter during any 24 hour period, and achieve an annual mean of 5 micrograms per cubic meter or less. Regarding PM10 concentrations, the WHO recommends not exceeding 45 micrograms per cubic meter during any 24 hour period and an annual mean of less than 15 micrograms per cubic meter.
Using the SDS011 sensor with a Raspberry Pi
An
SDS011 sensor
is capable of measuring both PM10 and PM2.5 concentration in micrograms per cubic
meter. The sensor operates by using a fan to collect air from the environment into a compartment
where a laser is shown.
Particles of varying sizes will affect how the laser is received by a diode at the other end of
the
compartment, and this effect can be used to estimate PM10 and PM2.5 concentrations with 90%
relative
accuracy.
This sensor integrates easily with a RaspberryPi via USB port.
Once connected, it can be accessed using the pySerial module available
from
PyPi. However, I've opted to use the py-sds011 module instead, which uses the
serial
package and abstracts away all of the low level hardware control. Once connected and the module
installed,
the sensor can be controlled as follows:
sensor = SDS011('/dev/ttyUSB0')  # creates a new sensor object mapped to the USB serial port controlling the sensor

sensor.sleep(sleep=False)  # turns on the sensor fan allowing the sensor to begin collecting measurements

fine_particles, coarse_particles = sensor.query()  # sensor.query() returns a tuple describing PM2.5 and PM10 concentrations
Uploading measurements to cloud storage
I've decided to use Google Cloud Storage (GCS) for this project since Firebase has direct access to GCS buckets. When developing apps in the past, I found Firebase to be an excellent solution for implementing cloud storage, push notifications, and user authentication. It has excellent documentation and provides many services for free. At this point, it is worth describing the goals of this project at a high level in order to better understand why GCS and Firebase were such an ideal solution. I wanted to interface the SDS011 sensor with an iOS application so that users could visualize air quality measurements over time and also receive notifications when air quality exceeds WHO guidelines. This requires installing an SDK on the Raspberry Pi used to upload measurement data to cloud storage, and another SDK (must be available through Swift Package manager) in order to access the cloud storage data from within an iOS app. Google Cloud Platform (GCP) has a well documented SDK available for many operating systems including Linux (running on my Raspberry Pi) and GCP also authors modules for most programming languages enabling code written in those languages to access GCP objects and services. This covers everything I need on the Raspberry Pi side of things. On iOS, the Firebase SDK allows for accessing data stored in GCS buckets, since Firebase storage runs on top of GCS itself. After installing the Google CLoud SDK on my Raspberry Pi and using the configuration script to authenticate into my account, I was ready to begin working on a Python script to collect measurements from the SDS011 sensor and upload them to GCS. Note that the file shown below contains logic for uploading measurements recorded at different intervals; this will be discussed later.
import csv
import time
from threading import Thread
from google.cloud import storage
from serial import SerialException
import secrets
from sds011 import *
"""
This file uses the sds011 module to control an SDS011 dust sensor for the purpose of measuring indoor air quality.
Air quality measurements are written to CSV files and uploaded to Cloud Storage.
Measurement files correspond to hours, weeks, days, and months of measurements.
Measurements for each time interval are collected on separate threads.
"""
def upload_blob(bucket_name, source_file_name, destination_blob_name):
"""
Called by perform_upload()
Uploads a local file to a specified bucket using a specified name.
@:param str bucket_name: Name of bucket to upload file to
@:param str source_file_name: Name of local file to upload
@:param str destination_blob_name: Name of file as shown in cloud storage
"""
storage_client = storage.Client(
project=secrets.project_name
)
bucket = storage_client.bucket(bucket_name)
blob = bucket.blob(destination_blob_name)
blob.upload_from_filename(source_file_name)
def perform_upload(file_object, source_filename, measurement_type):
"""
Closes a local file file object in preparation for uploading to
cloud storage. Prints the measurement interval of this file upload
to std::out and prepends the interval type to the filename.
@:param _io.TextIOWrapper file_object: The file object to close
@:param str source_filename: The local file name of the file object
@:param str measurement_type: What type of measurement the file contains (hourly, daily, weekly, or monthly)
"""
file_object.close()
print(f"Uploading {measurement_type.upper()}")
upload_blob(
bucket_name=secrets.bucket_name,
source_file_name=source_filename,
destination_blob_name=f'{measurement_type}/{source_filename}'
)
def curr_time():
return time.asctime(time.localtime())
def take_measurements(measurement_type):
"""
Opens a measurement file object and sets num_iterations to collect measurements to fill a corresponding time interval.
Collects one measurement of air quality each minute, until num_iterations is reached. Then the file object,
a CSV file describing measurements, will be uploaded to cloud storage.
@:param str measurement_type: What type of measurement the file contains (hourly, daily, weekly, or monthly)
"""
if measurement_type == 'hourly':
num_iterations = 60
elif measurement_type == 'daily':
num_iterations = 1440
elif measurement_type == 'weekly':
num_iterations = 10080
elif measurement_type == 'monthly':
num_iterations = 43800
else:
raise Exception(f"Invalid measurement_type provided: {measurement_type}. Must be hourly, daily, weekly, or monthly.")
while True:
curr_file_name = f"{curr_time()}.csv"
file = open(curr_file_name, "w")
writer = csv.writer(file)
for interval in range(num_iterations):
"""
Multiple threads attempting to access the sensor at the same may result in a race condition,
fortunately the Serial package avoids this but will throw an exception. Handle by waiting one second,
then re-attempting the measurement.
"""
try:
fine_particles, coarse_particles = sensor.query()
except SerialException:
time.sleep(1)
fine_particles, coarse_particles = sensor.query()
writer.writerow(["PM2.5", fine_particles, curr_time()])
writer.writerow(["PM10", coarse_particles, curr_time()])
print(
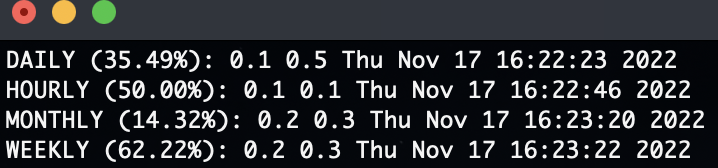
f"{measurement_type.upper()} ({((interval / num_iterations) * 100):.2f}%): {fine_particles} {coarse_particles} {curr_time()}")
time.sleep(60)
perform_upload(file, curr_file_name, measurement_type)
if __name__ == '__main__':
sensor = SDS011("/dev/ttyUSB0")
sensor.sleep(sleep=False)
print("Preparing sensor...")
time.sleep(15)
print("Sensor is now running:")
# Threading is used to allow for hourly, daily, weekly, and monthly files to be written to and uploaded synchronously.
threads = [Thread(target=take_measurements, args=['hourly']),
Thread(target=take_measurements, args=['daily']),
Thread(target=take_measurements, args=['weekly']),
Thread(target=take_measurements, args=['monthly'])]
for thread in threads:
thread.start()
This results in output as shown below:
Creating an iOS app to visualize measurement data
With measurement data ready and waiting in the cloud, the next step was to begin developing an iOS application to download this data and visualize it using Swift Charts. For readers familiar with iOS development, I've decided to use SwiftUI as opposed to UIKit in order to get up and running quickly.
-
Within the
AppDelegateclass I initialize the FirebaseSDK by calling itsconfiguremethod. -
permissionRequest()is also called, which is responsible for accessing the iOS notification center in order to request the user to allow notifications from this app, and provide an action allowing them to dismiss the notification once received. This will result in an alert dialog prompting the user to make a decision as shown to the left. - The application is also instructed to register for remote notifications. The result of this registration attempt will be handled below.
class AppDelegate: NSObject, UIApplicationDelegate {
    func application(_ application: UIApplication,
                        didFinishLaunchingWithOptions launchOptions: [UIApplication.LaunchOptionsKey : Any]? = nil) -> Bool {

        FirebaseApp.configure()
        permissionRequest()
        UIApplication.shared.registerForRemoteNotifications()

        return true
    }

    func permissionRequest() {
        /*
            Access the user notification center and request permission to send notifications
            */
        let center = UNUserNotificationCenter.current()
        center.requestAuthorization(options: [.alert, .sound]) { granted, error in
            if let error = error {
                print(error)
            }
        }

        /*
            Define an action allowing the user to dismiss the air quality alert and add this action
            to an AirQualityNotification Category of notifications.
            */
        let dismissAction = UNNotificationAction(identifier: "DISMISS", title: "OK", options: [])
        let airQualityNotification = UNNotificationCategory(identifier: "AIR_QUALITY", actions: [dismissAction], intentIdentifiers: [])
        center.setNotificationCategories([airQualityNotification])
    }
-
AppDelegatealso contains logic to handle either a successful or unsuccessful registration attempt. - If registration succeeds, a unique device token will be transmitted to a back-end web server I wrote using Go. This server is described further below on this page.
-
The logic contained in
application(_, didRegisterForRemoteNotificationsWithDeviceToken)expects to receive an HTTP status code 201, indicating that the server has received the web token and created a new entry corresponding to it. - If registration fails, a message is printed to the debugging console. In a production app, it would be better practice to re-attempt transmitting the token several times, and if this fails, to notify the user that they will not be able to receive push notifications.
func application(
    _ application: UIApplication,
    didRegisterForRemoteNotificationsWithDeviceToken deviceToken: Data
) {
    let tokenParts = deviceToken.map { data in String(format: "%02.2hhx", data) }
    let token = tokenParts.joined()
    print("Device Token: \(token)")

    // send token to web server
    let url = URL(string: Secrets.APNsServer)

    var request = URLRequest(url: url!)
    request.setValue("application/json", forHTTPHeaderField: "Content-Type")
    request.httpMethod = "POST"
    let parameters: [String: Any] = ["ID": token]

    do {
        request.httpBody = try JSONSerialization.data(withJSONObject: parameters)
    } catch {
        print("Could not serialize device token: \(error.localizedDescription)")
        return
    }

    let session = URLSession.shared
    let task = session.dataTask(with: request) { data, response, error in
        if let error = error {
            print("Error initiating data task: \(error.localizedDescription)")
            return
        }


        guard let httpResponse = response as? HTTPURLResponse,
                (httpResponse.statusCode == 201)
        else {
            print("Invalid response from APNs server")
            return
        }
    }
    task.resume()
}

func application(
    _ application: UIApplication,
    didFailToRegisterForRemoteNotificationsWithError error: Error
) {
    print("Failed to register for remote notifications: \(error)")
}
}
-
Once the application launches, the first view the user will see is
ContentView. - This view consists of a list allowing the user to select a given measurement interval.
- The first time that the app launches, the user will be prompted to grant or deny permission to receive notifications.
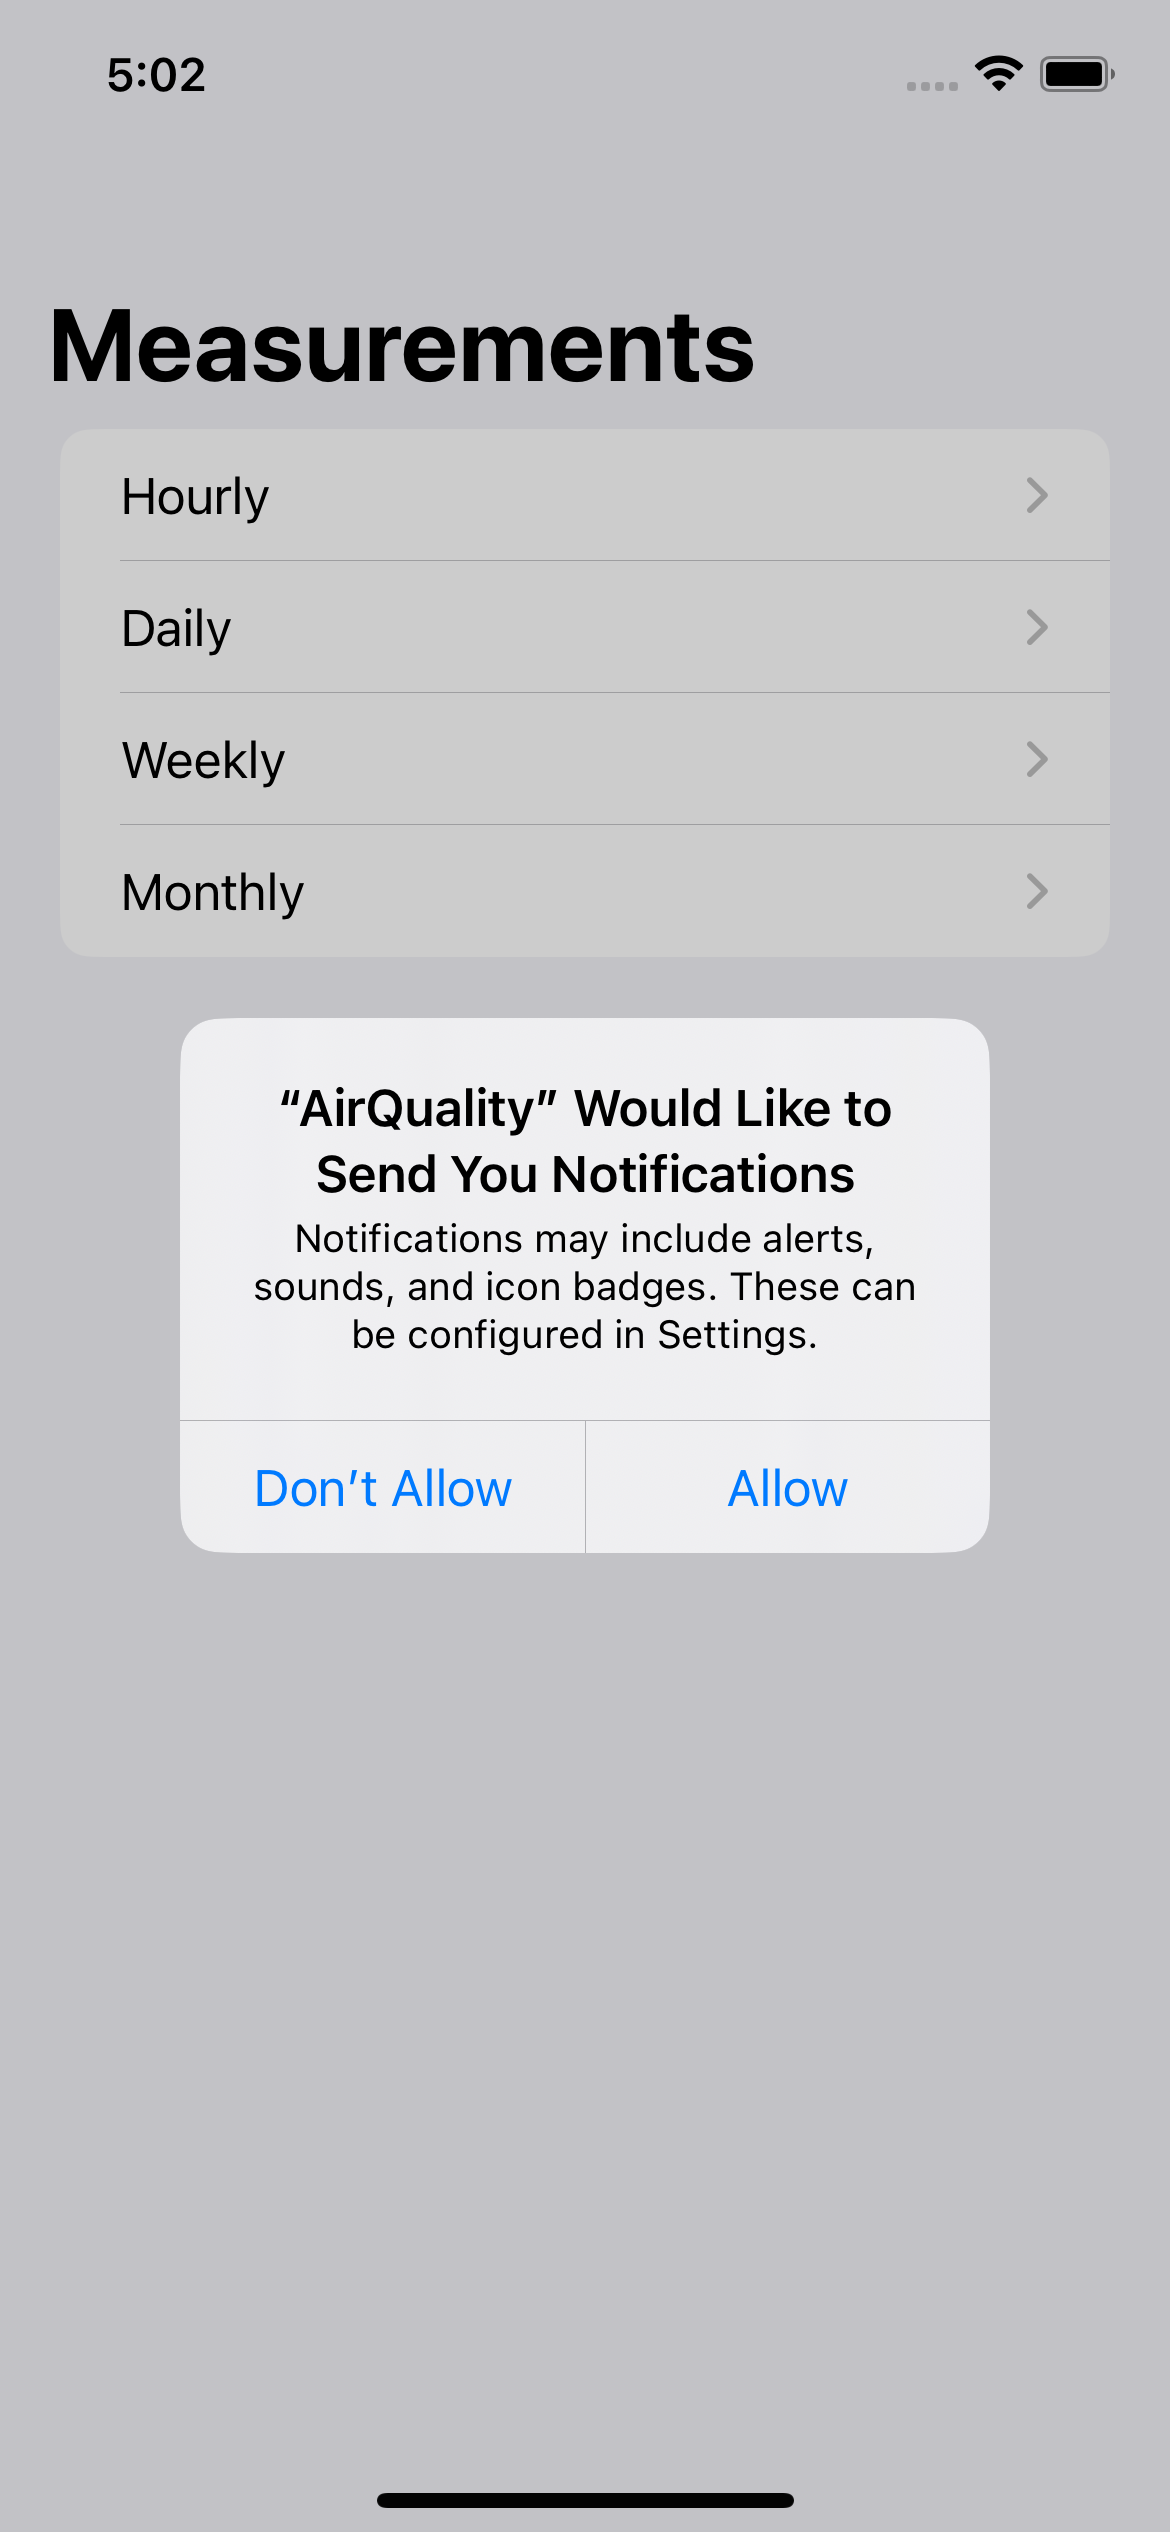
struct ContentView: View {
@State var apiResponse: Response? // used to hold information received from API (see Python/alert.py)
@State var showAlert = false // controls the display of the alert defined in this file
var body: some View {
NavigationView{
List {
NavigationLink{
HourlyList()
} label: {
Text("Hourly")
}
NavigationLink{
DailyList()
} label: {
Text("Daily")
}
NavigationLink{
WeeklyList()
} label: {
Text("Weekly")
}
NavigationLink{
MonthlyList()
} label: {
Text("Monthly")
}
}
.navigationBarTitleDisplayMode(.large)
.navigationTitle("Measurements")
.onAppear {
requestAlert()
}
.alert(isPresented: $showAlert) {
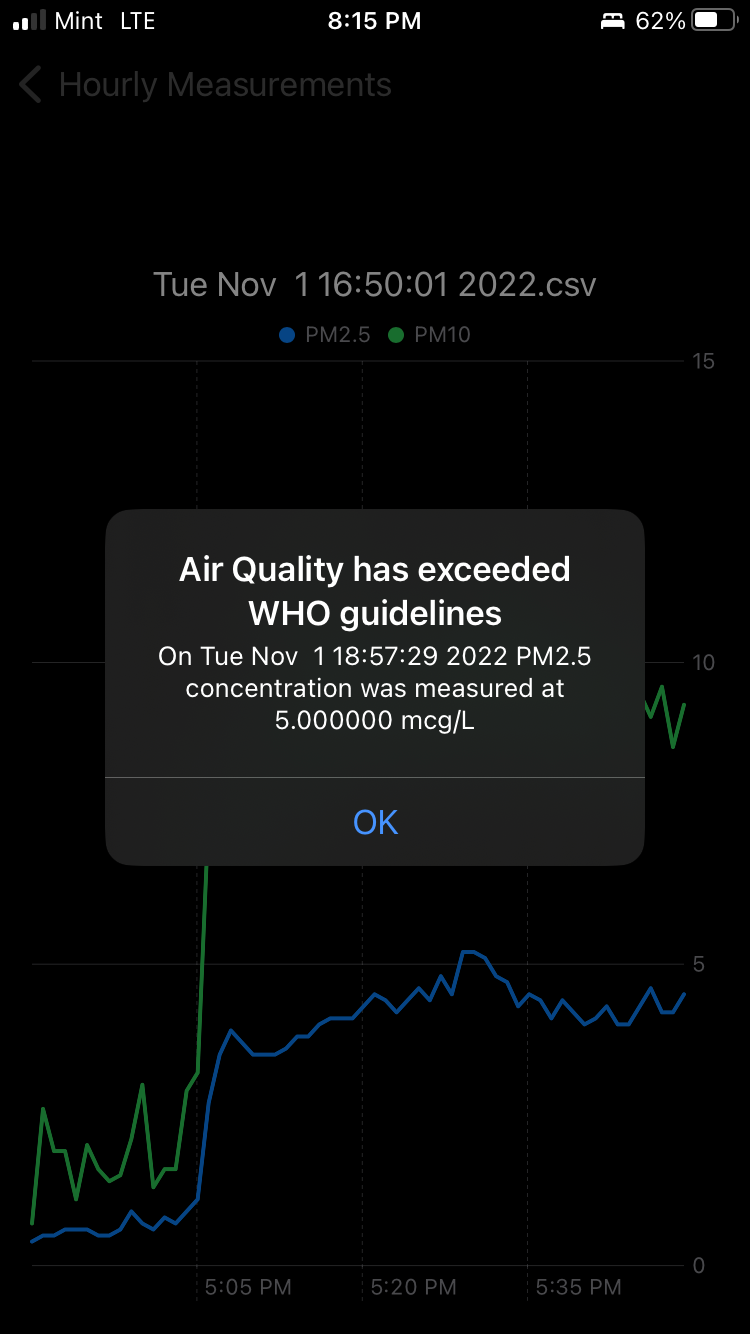
Alert(title: Text("Air Quality has exceeded WHO guidelines"), message: Text("On \(apiResponse!.time) \(apiResponse!.pollutant) concentration was measured at \(apiResponse!.value) mcg/L"), dismissButton: .default(Text("OK")))
}
}
}
func requestAlert() { // this function is unrelated to the alerts so far discussed here,
// and will be discussed in the section 'Analyzing measurements in Cloud Storage'
let api = URL(string: Secrets.AlertAPI)
let sesson = URLSession(configuration: .default)
let task = sesson.dataTask(with: api!) { data, response, error in
if error == nil {
let decoder = JSONDecoder()
if let safeData = data {
do {
let results = try decoder.decode(Response.self, from: safeData)
self.apiResponse = results
print(results)
if apiResponse!.alert == true {
showAlert = true
}
} catch {
print(error)
}
}
}
}
task.resume()
}
}
- When a user taps on a measurement interval, the app will navigate to a view listing all of the files in the GCS bucket belonging to that particular measurement interval.
- In order for these views to access the files, it is first necessary to define a class dedicated to accessing the storage bucket and listing all of the files present there.
-
When an instance of this class is created, the
init()method runs which will list all prefixes contained in the bucket. - A prefix corresponds exactly to a given measurement interval.
- Since hourly measurements accrue very quickly, I have implemented logic that will not only not display hourly measurement files older than the present day in the list view, but will also delete them from cloud storage.
- Firebase Storage provides a generous amount of storage space, but I prefer to keep things tidy. Before implementing this, the list of hourly measurements grew so long after just a few days that the app wasn't very enjoyable to use.
- All measurement files corresponding to a given measurement type are downloaded and appended to an array dedicated to their measurement type.
-
These arrays are all annotated with the
@Publishedproperty wrapper indicating that they are not only accessible from other classes and structs (views) that instantiate the class, but what's even better is that the SwiftUI framework takes care of automatically updating any views that reference these arrays automatically. - With the cloud storage logic implemented, we can proceed to exploring how measurement files are presented to the user.
public class CloudStorage: ObservableObject {

    let storage = Storage.storage() // a reference to the Cloud Storage bucket used in this project

    /*
        Create arrays of StorageReference types for each measurement interval
        */
    @Published public var hourlyItems = [StorageReference]()
    @Published public var dailyItems = [StorageReference]()
    @Published public var weeklyItems = [StorageReference]()
    @Published public var monthlyItems = [StorageReference]()

    func format_date(_ string: String) -> Date {
        let dateAsString = string
        let df = DateFormatter()
        df.dateFormat = "EEE MMM d HH:mm:ss y"
        df.timeZone = TimeZone(identifier: "MST")
        df.locale = Locale(identifier: "en_US_POSIX")
        return df.date(from: dateAsString)!
    }

    init() {
        Task(priority: .high) {
            let ref = storage.reference()
            ref.listAll { (result, error) in
                if let error = error {
                    print(error)
                }
                if let result = result {
                    /* measurement files are prefixed by the intervals in which they were
                        taken: hourly, daily, weekly, and monthly.
                        */
                    for prefix in result.prefixes {
                        prefix.listAll { result, error in
                            if let error = error {
                                print(error)
                            }
                            switch prefix.name {

                            case "hourly":
                                if let result = result {
                                    for item in result.items {
                                        /*
                                            Format how hourly measureent files are displayed to the user as a
                                            more readable date format: Nov 6. 2022 at 12:00 AM
                                            */
                                        let fileName = item.name // Sun Nov 6 07:49:04 2022
                                        let beginSubString = fileName.startIndex
                                        let endSubString = fileName.index(fileName.endIndex, offsetBy: -4)
                                        let range = beginSubString..24 measurement files.
                                            */
                                        let measurementDate = self.format_date(stringDescribingDate)
                                        let currentDate = NSDate()

                                        let currentDay = Calendar.current.dateComponents([.day, .month, .year], from: currentDate as Date)
                                        let measurementDay = Calendar.current.dateComponents([.day, .month, .year], from: measurementDate)

                                        if (measurementDay == currentDay) { // only show hourly measurements for the current day
                                            self.hourlyItems.append(item)
                                        }
                                        else { // delete the measurements from prior days
                                            item.delete { error in
                                                if let error = error{
                                                    print("Could not delete expired hourly measurement: \(error)")
                                                }
                                            }
                                        }
                                    }
                                }

                            case "daily":
                                if let result = result {
                                    for item in result.items {
                                        self.dailyItems.append(item)
                                    }
                                }

                            case "weekly":
                                if let result = result {
                                    for item in result.items {
                                        self.weeklyItems.append(item)
                                    }
                                }

                            case "monthly":
                                if let result = result {
                                    for item in result.items {
                                        self.monthlyItems.append(item)
                                    }
                                }

                            default:
                                print("Prefix of tyoe \(prefix.name) was not added!!!")
                            }

                        }
                    }
                }
            }
        }
    }
}
-
The
HourlyListcreates an instance of theCloudStorageclass in order to access data present in the GCS bucket. -
This view also contains state variables
APIResponseandshowAlert. These are connected to therequestAlert()method which runs each time a view in the app is loaded. - This functionality will be discussed later on in the section 'Analyzing measurements in Cloud Storage'.
-
This struct also contains a method to format the date from a Python
asctime()string to a format that is more user friendly. - The views corresponding to hourly, weekly, daily, and monthly measurements all use the same logic described in this view.
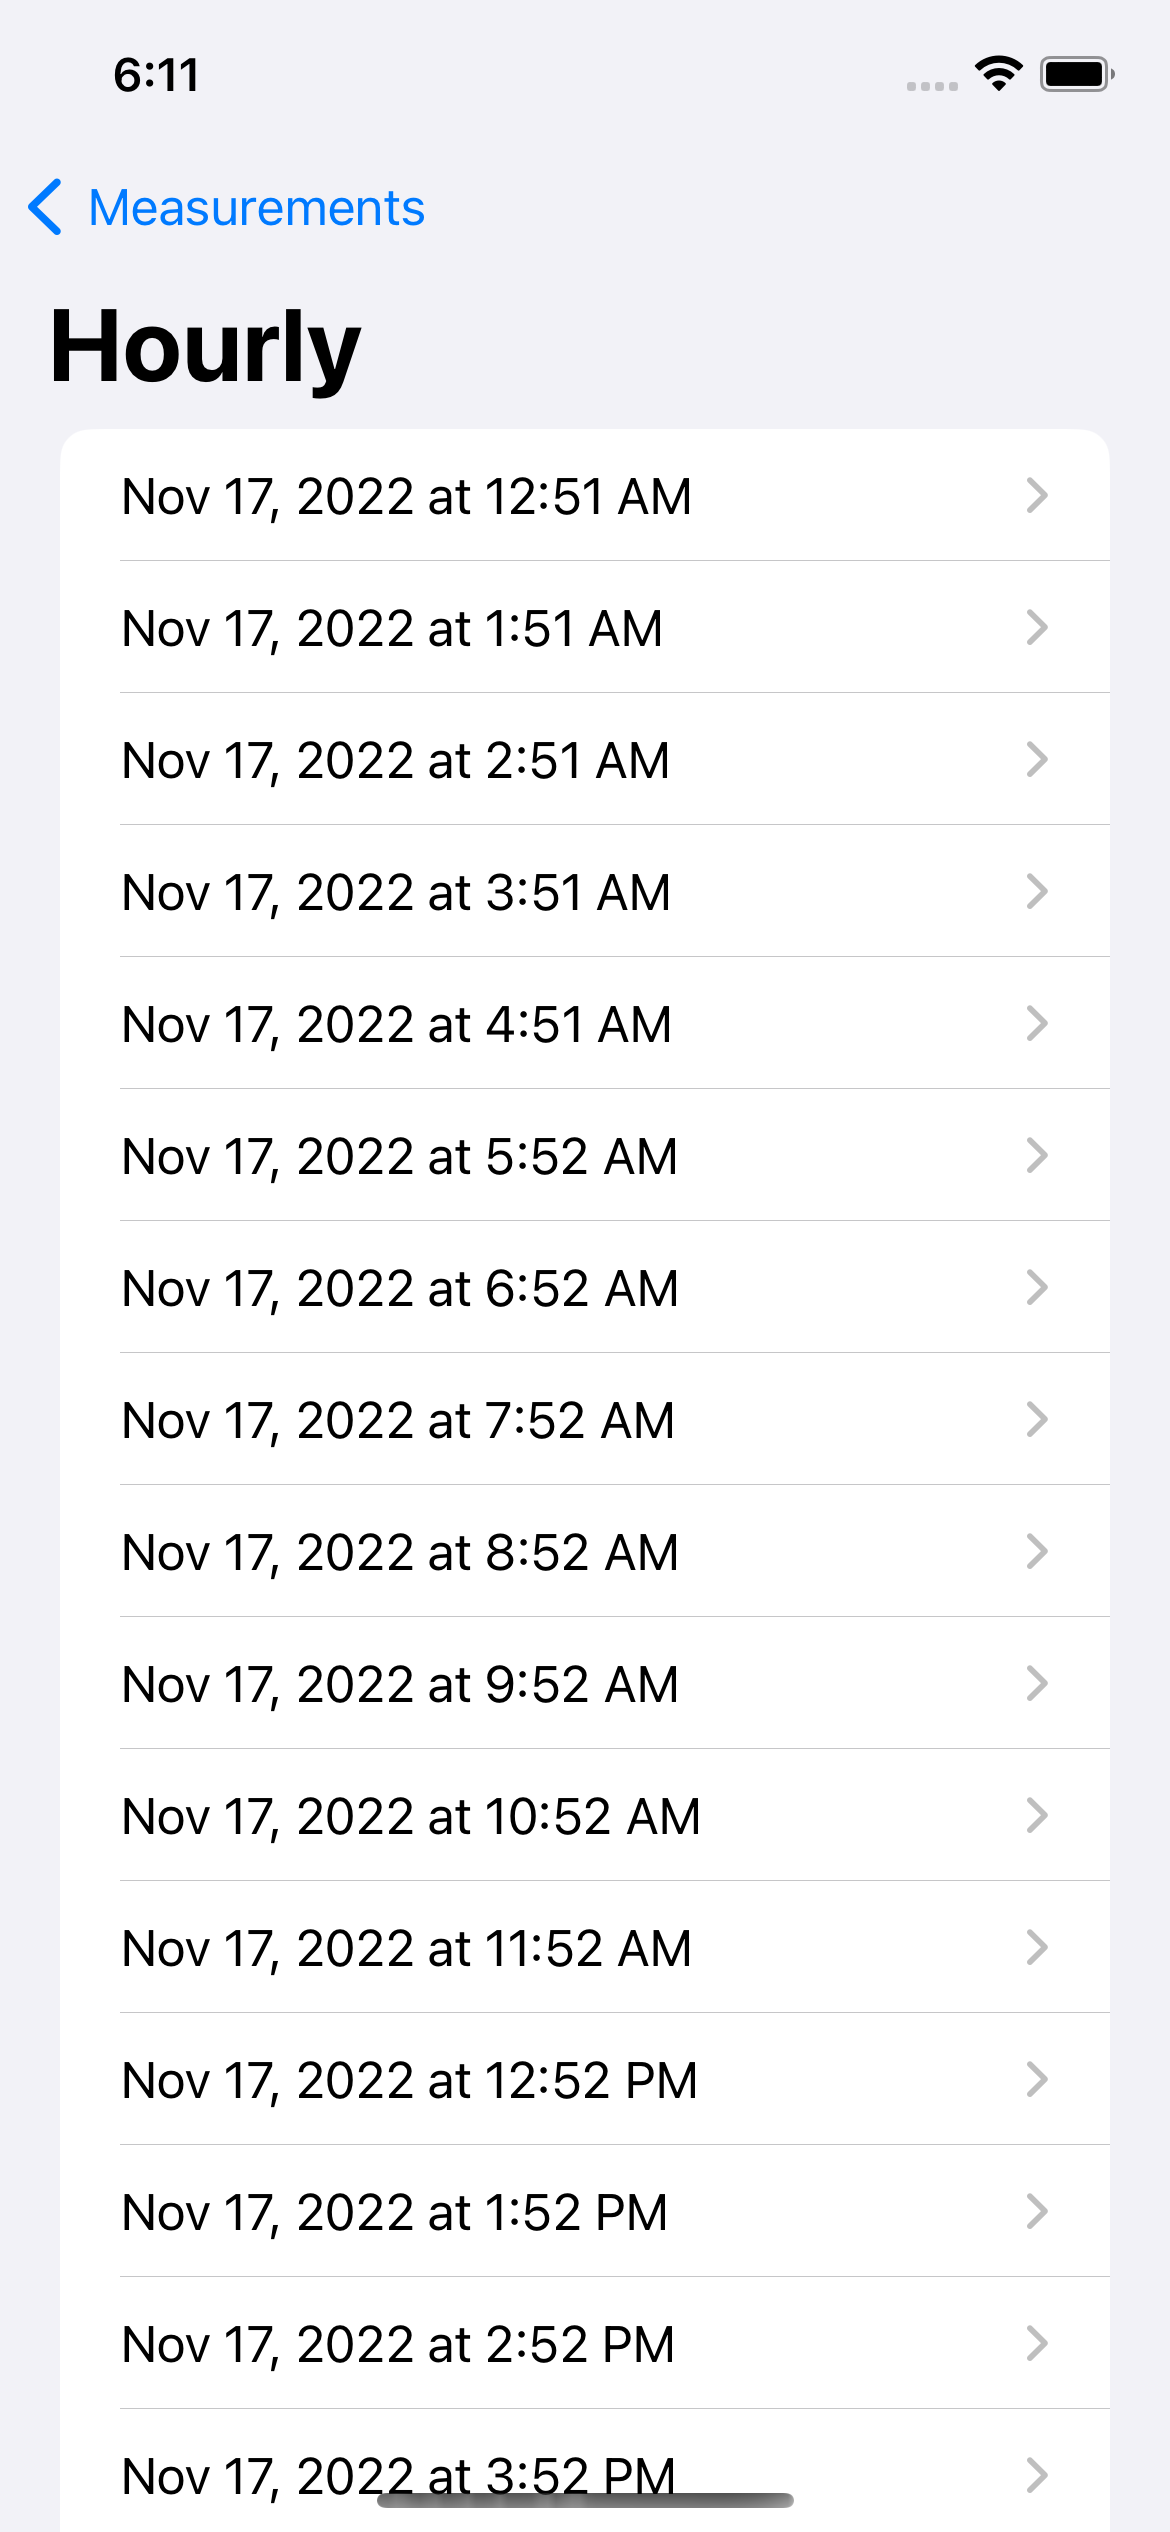
struct HourlyList: View {
    @StateObject private var cloudStorage = CloudStorage()
    @State public var chosenFile: String?
    @State var apiResponse: Response?
    @State var showAlert = false

    var body: some View {
            List(cloudStorage.hourlyItems, id: \.self) { reference in
                NavigationLink{
                    DataView(chosenFile: reference.fullPath)
                } label: {
                    /*
                        It is necessary to perform some work already performed in CloudStorage.swift
                        in order to display hourly measurement files in a more readable format (see CloudStorage.swift).

                        This is because an hourlyItem is really an array of type StorageReference, defined
                        in the Firebase Storage package, and is not capable of holding an additional member
                        describing the more readable filename.

                        Why is this work still performed in CloudStorage.swift?
                        Because it simplifies the process of determining a measurement (StorageReference)
                        date, and this is necessary to remove old measurements from Cloud Storage.
                        */
                    let fileName = reference.fullPath
                    let beginSubString = fileName.index(fileName.startIndex, offsetBy: 7)
                    let endSubString = fileName.index(fileName.endIndex, offsetBy: -4)
                    let range = beginSubString..<endSubString
                    let subString = fileName[range]
                    let stringDescribingDate = String(subString)

                    Text(self.format_date(stringDescribingDate))
                }
            }
        .navigationBarTitleDisplayMode(.large)
        .navigationTitle("Hourly")
        .onAppear {
            requestAlert()
        }
        .alert(isPresented: $showAlert) {
            Alert(title: Text("Air Quality has exceeded WHO guidelines"), message: Text("On \(apiResponse!.time) \(apiResponse!.pollutant) concentration was measured at \(apiResponse!.value) mcg/L"), dismissButton: .default(Text("OK")))
        }
    }

    /*
        Provided a string, this function will format that string according to a provided
        timezone and locale.
        */
    func format_date(_ string: String) -> String {
        let dateAsString = string
        let df = DateFormatter()
        df.dateFormat = "EEE MMM d HH:mm:ss y"
        df.timeZone = TimeZone(identifier: "MST")
        df.locale = Locale(identifier: "en_US_POSIX")
        let date = df.date(from: dateAsString)!
        return DateFormatter.localizedString(from: date, dateStyle: .medium, timeStyle: .short)
    }

    func requestAlert() {
        let api = URL(string: "http://ec2-35-160-195-137.us-west-2.compute.amazonaws.com:8080/")
        let sesson = URLSession(configuration: .default)
        let task = sesson.dataTask(with: api!) { data, response, error in
            if error == nil {
                let decoder = JSONDecoder()
                if let safeData = data {
                    do {
                        let results = try decoder.decode(Response.self, from: safeData)
                        self.apiResponse = results
                        print(results)
                        if apiResponse!.alert == true {
                            showAlert = true
                        }
                    } catch {
                        print(error)
                    }
                }
            }
        }
        task.resume()
    }
}
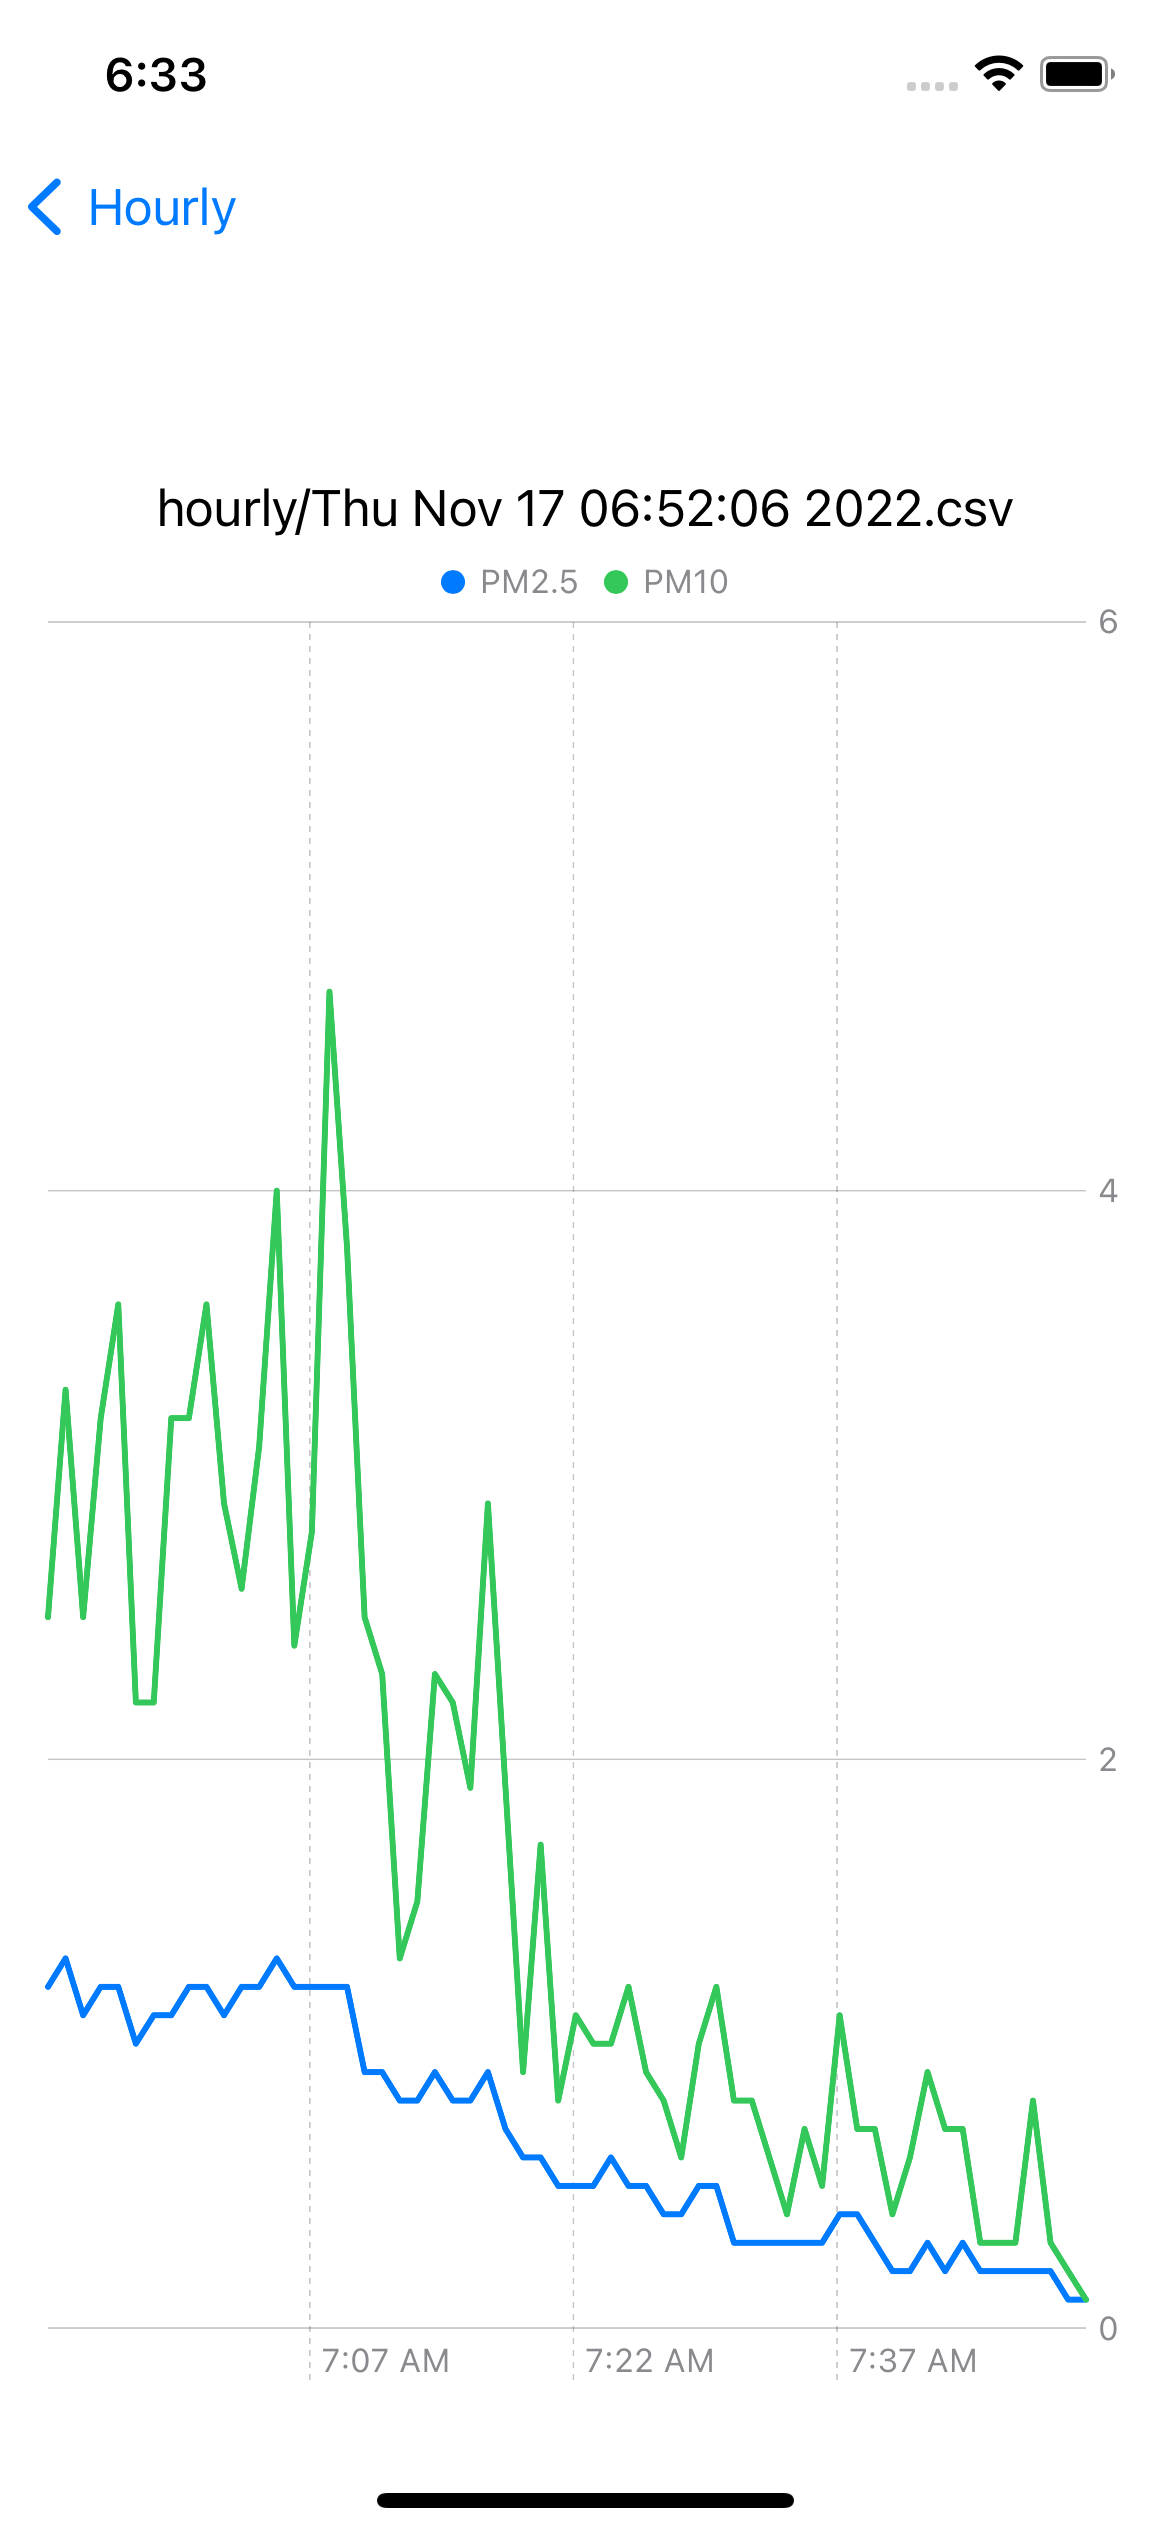
- With the user interface established to allow a user to first select a measurement interval, and then a specific measurement, we can now implement code to read in the CSV file and map the data contained therein onto a 2D plane, with particle concentrations shown on the y-axis and the x-axis corresponding to the time domain.
-
A
DataViewstruct will be used to display such a view. -
A new
DataViewis created each time a user taps on a measurement file. - The view expects the tapped filename as an argument.
- The chosen file will be downloaded from the bucket, and its rows mapped to individual measurement objects.
-
DataViewcontains an arraymeasurementswhich will hold all of these measurements, parsed from the CSV file. -
A measurement object is defined as follows:
struct Measurement: Identifiable { var id: Date // time of measurement var type: String var measurement: Float } -
A chart can then be created from the
measurementsarray. -
Each measurement contains an
idmember of typeDatewhich identifies when the measurement occurred. -
Additionally, each measurement contains a
typemember denoting whether it is a PM10 or PM2.5 measurement. -
Lastly, each measurement has a
measurementmember describing the measurement value as aFloat. - All of these members are necessary in order to display a time series of measurement values with PM10 and PM2.5 shown as different lines.
struct DataView: View {
    let storage = Storage.storage()
    @State public var measurements = [Measurement]() // holds all measurements present in the chosen file
    let chosenFile: String // reference to the file that the user tapped

    // API Response and alert handling
    @State var apiResponse: Response?
    @State var showAlert = false


    func downloadFile(filePath: String) {
        measurements = [Measurement]()
        let ref = storage.reference(forURL: "\(Secrets.StorageBucket)\(chosenFile)")
        var localURL: URL?

        do { // create local download url
            let documentURL = try FileManager.default.url(for: .documentDirectory, in: .userDomainMask, appropriateFor: nil, create: true)
            localURL = documentURL.appendingPathComponent(chosenFile)
        } catch {
            print("Error generating local download URL")
            return
        }

        if let safeURL = localURL { // download chosen file
            _ = ref.write(toFile: safeURL) { url, error in
                if let error = error {
                    print(error)
                    return
                } else {
                    let raw_measurements = parseCSV(safeURL)
                    for each in raw_measurements {
                        let measurement: [String] = each.components(separatedBy: ",")

                        // final row contains nothing, skip this row
                        guard (measurement.count == 3) else {
                            return
                        }

                        measurements.append(Measurement(id: format_date(measurement[2]), type: measurement[0], measurement: Float(measurement[1]) ?? 0.0))
                    }
                }
            }
        }
    }

    func format_date(_ string: String) -> Date {
        let dateAsString = string
        let df = DateFormatter()
        df.dateFormat = "EEE MMM d HH:mm:ss y "
        df.timeZone = TimeZone(identifier: "MST")
        df.locale = Locale(identifier: "en_US_POSIX")
        return df.date(from: dateAsString)!
    }

    func parseCSV(_ url: URL) -> Array {
        do {
            let content = try String(contentsOf: url)
            let parsedCSV: [String] = content.components(separatedBy: "\n")
            return parsedCSV
        }
        catch {
            print("Error parsing CSV")
            return []
        }
    }

    func requestAlert() {
        let api = URL(string: Secrets.AlertAPI)
        let sesson = URLSession(configuration: .default)
        let task = sesson.dataTask(with: api!) { data, response, error in
            if error == nil {
                let decoder = JSONDecoder()
                if let safeData = data {
                    do {
                        let results = try decoder.decode(Response.self, from: safeData)
                        self.apiResponse = results
                        print(results)
                        if apiResponse!.alert == true {
                            showAlert = true
                        }
                    } catch {
                        print(error)
                    }
                }
            }
        }
        task.resume()
    }

    var body: some View {
        VStack {
            Text(chosenFile)
            Spacer()
            Chart(measurements){
                LineMark (
                    x: .value("Time", $0.id),
                    y: .value("Measurement", $0.measurement)
                )
                .foregroundStyle(by: .value("Measurement Type", $0.type))
            }
            .chartLegend(position: .top, alignment: .center)
        }
        .onAppear {
            downloadFile(filePath: chosenFile)
            requestAlert()
        }
        .alert(isPresented: $showAlert) {
            Alert(title: Text("Air Quality has exceeded WHO guidelines"), message: Text("On \(apiResponse!.time) \(apiResponse!.pollutant) concentration was measured at \(apiResponse!.value) mcg/L"), dismissButton: .default(Text("OK")))
        }
        .padding()
    }
}

- Opening my windows
- Closing my windows

- An example of a daily measurement chart
Analyzing measurements in Cloud Storage
In the Swift code above, you likely noticed that each struct conforming to a View contained the following method:
func requestAlert() {
    let api = URL(string: Secrets.AlertAPI)
    let sesson = URLSession(configuration: .default)
    let task = sesson.dataTask(with: api!) { data, response, error in
        if error == nil {
            let decoder = JSONDecoder()
            if let safeData = data {
                do {
                    let results = try decoder.decode(Response.self, from: safeData)
                    self.apiResponse = results
                    print(results)
                    if apiResponse!.alert == true {
                        showAlert = true
                    }
                } catch {
                    print(error)
                }
            }
        }
    }
    task.resume()
}
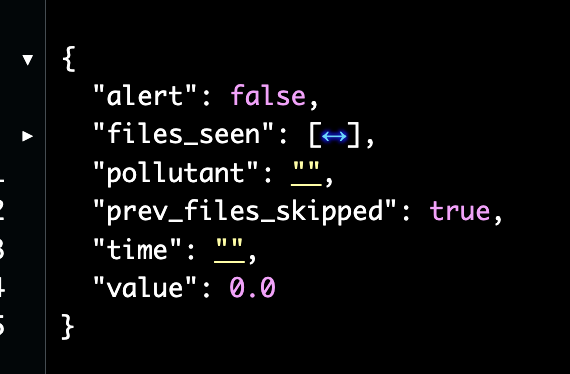
The purpose of this method is to contact an API that will return a JSON object describing whether or not an alert should be shown, and if it should, some additional information about the measurement responsible for the alert. An example response is shown below:
 "
"
As shown, the API returns an alert field of boolean type indicating whether or not an alert should be displayed to the user, and additionally the type of pollutant responsible for the offending air quality measurement as well as the time that the measurement was taken and the particle concentration.
The requestAlert() method is added to the onAppear() view modifier so
that
it will run each time
a view is loaded:
var body: some View {
    NavigationView{
        List {
            ...
        }
        .onAppear {
            requestAlert()
        }
        .alert(isPresented: $showAlert) {
            Alert(title: Text("Air Quality has exceeded WHO guidelines"), message: Text("On \(apiResponse!.time) \(apiResponse!.pollutant) concentration was measured at \(apiResponse!.value) mcg/L"), dismissButton: .default(Text("OK")))
        }
    }
}
When the alert field in the JSON response is set to true, then the app will display
an
alert as shown below:
Next, let's look at how the API was implemented:
- A Flask app oject is created and some set up is performed in order to access the files contained in the GCS bucket.
- Global variables are defined in order to contain information that will be sent by this API in response to a request.
- Alerts should only be triggered once for each offending measurement. This makes it necessary to keep a list of files which have already been scanned for measurements exceeding WHO guidelines.
"""
This file implements a Flask application with one endpoint (/).
When this endpoint receives an HTTP GET request, it will analyze all files in cloud storage to determine if air
quality guidelines set by the WHO have been exceeded. If so, the JSON response will include an "alert": true
field that will be used to trigger an alert in an iOS app that contacts the API endpoint. Additionally, the JSON
response will contain relevant information about the measurement responsible for the alert such as what time the
measurement occurred, the offending pollutant, and the measured concentration of that pollutant.
"""

app = Flask(__name__)

"""
Google Cloud Storage Variables
"""
cred = credentials.Certificate("key.json")
firebase_admin.initialize_app(cred, {'storageBucket': secrets.bucket_name})
bucket = storage.bucket()

"""
These variables will be part of JSON response served by this API
"""
alert = False
pollutant = ''
value = 0.0
measurement_time = ''
skipped_prev_files = False

"""
Keep track of viewed files to avoid duplicate alerts
"""
viewed_files = []
-
A
reset_alert()function is defined that will reset global variables before analyzing unseen files. -
A
read_new_files()function is defined that will programmatically analyze each measurement file contained in the storage bucket. - If a file has already been analyzed, it will be skipped.
- If a file has not been analyzed already, the individual rows in the CSV file will be parsed in order to find a PM2.5 measurement in excess of 5 micrograms per cubic meter or a PM10 measurement in excess of 15 micrograms per cubic meter.
- If a measurement violating WHO guidelines is found, global variables used to store information about the measurement will be updated in preparation for sending a JSON object describing the measurement to the iOS app as a response.
- For debugging and visibility, the program also outputs information to the command line describing the alert information.
- Additionally, some global variables contain information that is not used in the iOS app, but is useful for testing and debugging.
-
skipped_prev_filesshould only ever beFalsethe first time the API scans the GCS bucket. -
viewed_filescontains a list of all files that have been seen and analyzed by theread_new_files()function.
def reset_alert():
    global alert
    global pollutant
    global value
    global measurement_time
    global skipped_prev_files
    global viewed_files
    alert = False
    pollutant = ''
    value = 0.0
    measurement_time = ''


def read_new_files():
    global alert
    global pollutant
    global value
    global measurement_time
    global skipped_prev_files
    global viewed_files

    files = list(bucket.list_blobs())

    """
    For each file in the bucket, determine if the file has been read previously.
    If it has, skip it, and set skipped_prev_files to True.

    If the file has not been read before, download it locally and parse the CSV
    searching for rows that contain a measurement exceeding WHO guidelines.
    Lastly, add the file to the viewed_files list.
    """
    for each in files:

        if each.name in viewed_files:
            skipped_prev_files = True

        elif each.name not in viewed_files:
            dest = f"./blobs/{each.name}"
            each.download_to_filename(dest)

            with open(dest, 'r') as hourly:
                print(f"Reading {each}")
                num_row = 0
                reader = csv.reader(hourly, delimiter=',')
                for row in reader:
                    if row[0] == 'PM2.5':
                        measurement = float(row[1])
                        if measurement >= 5.0:
                            alert = True
                            value = measurement
                            pollutant = 'PM2.5'
                            measurement_time = row[2]
                            print(f"Alert at {measurement_time} for {pollutant} measured at {value}")
                    elif row[0] == 'PM10':
                        measurement = float(row[1])
                        if measurement >= 15.0:
                            alert = True
                            value = measurement
                            pollutant = 'PM10'
                            measurement_time = row[2]
                            print(f"Alert at {measurement_time} for {pollutant} measured at {value}")
                    else:
                        print(f"ERROR Unexpected value found on line {num_row}")

                    num_row += 1

            viewed_files.append(each.name)


@app.route("/")
def check_alert():
    reset_alert()
    read_new_files()
    return {
        "alert": alert,
        "pollutant": pollutant,
        "value": value,
        "time": measurement_time,
        "files_seen": viewed_files,
        "prev_files_skipped": skipped_prev_files
    }


if __name__ == "__main__":
    app.run(debug=True, host="0.0.0.0", port=int(os.environ.get("PORT", 8080)))
Adding these additional variables to the API allows for accessing the root endpoint in a web browser and investigating the APIs state:
Sending push notifications to the iOS app and incorporating an LED light strip
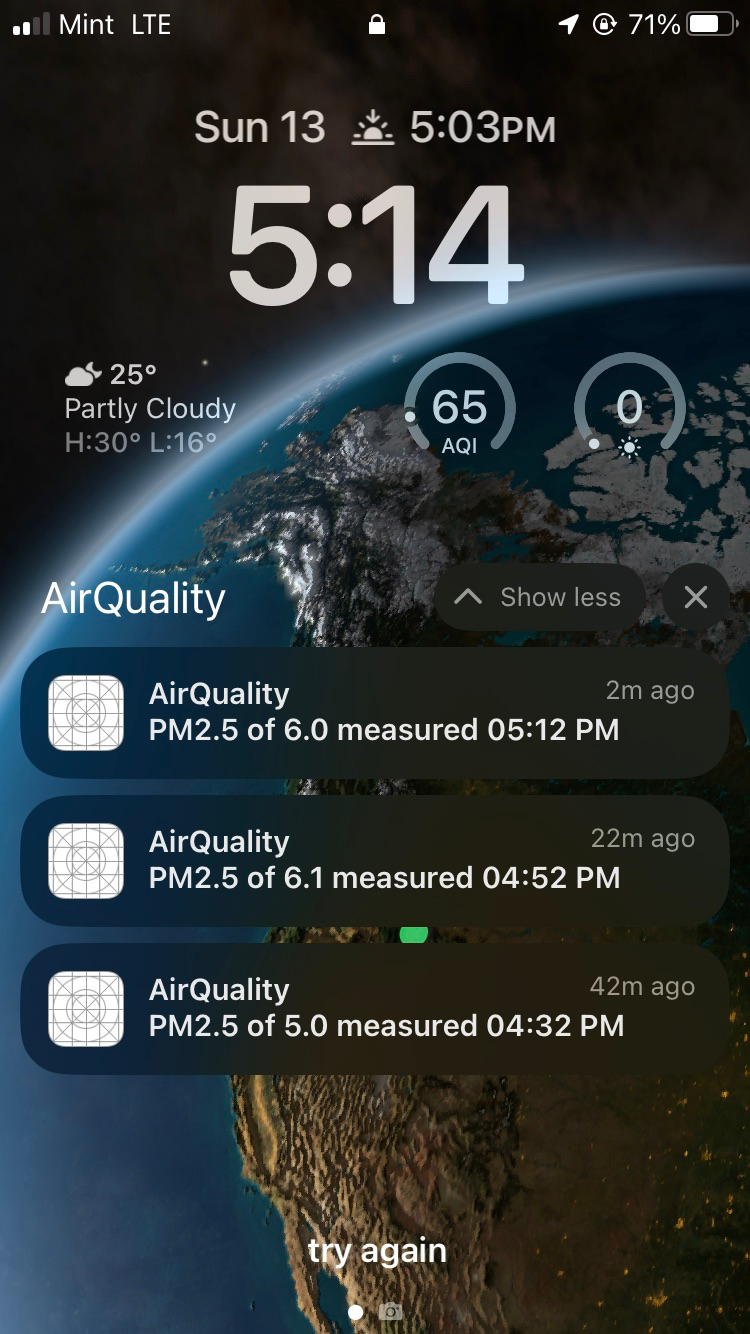
The API described above was both interesting and instructive to build, but it is not a very optimal way to integrate notifications into the app. Notifications will only ever be presented to the user if they launch the app. A request will be sent to the API each time the user taps on a file, or navigates to a previous view, and if a user is viewing a lot of files in a given session these network requests become redundant. There could be up to an hour long delay between a measurement exceeding WHO guidelines and the user being presented with an alert. This could happen if the alert occurs early in the hourly measurement interval and the file is not uploaded to cloud storage for 50+ additional minutes.
Furthermore, each time the API is contacted, it has to loop through a growing list of measurement files to determine if they have already been analyzed, and then analyze all of the new files. There are ways to optimize this process, but it would be even better to incorporate the logic of triggering an alert directly from the Raspberry Pi, in real time as measurements are taken, and before waiting for a measurement interval to complete before uploading to cloud storage. This is an excellent strategy because it eliminates the very inefficient API implementation described above, and also allows for controlling an LED light strip connected to the Raspberry Pi that can display a visual representation of current air quality to system users.
The file below will resemble the air.py file that was described at the top of this
page,
but it has been changed to include the ability to control an LED light strip and send an alert
request
to Apple Push Notification services (APNs, described in detail below) at the exact moment an
individual
measurement is taken.
Note that threading is no longer necessary, as this file doesn't upload measurements to cloud
storage.
air.py is still
used to upload measurement files so that they can be visualized in the iOS app.
-
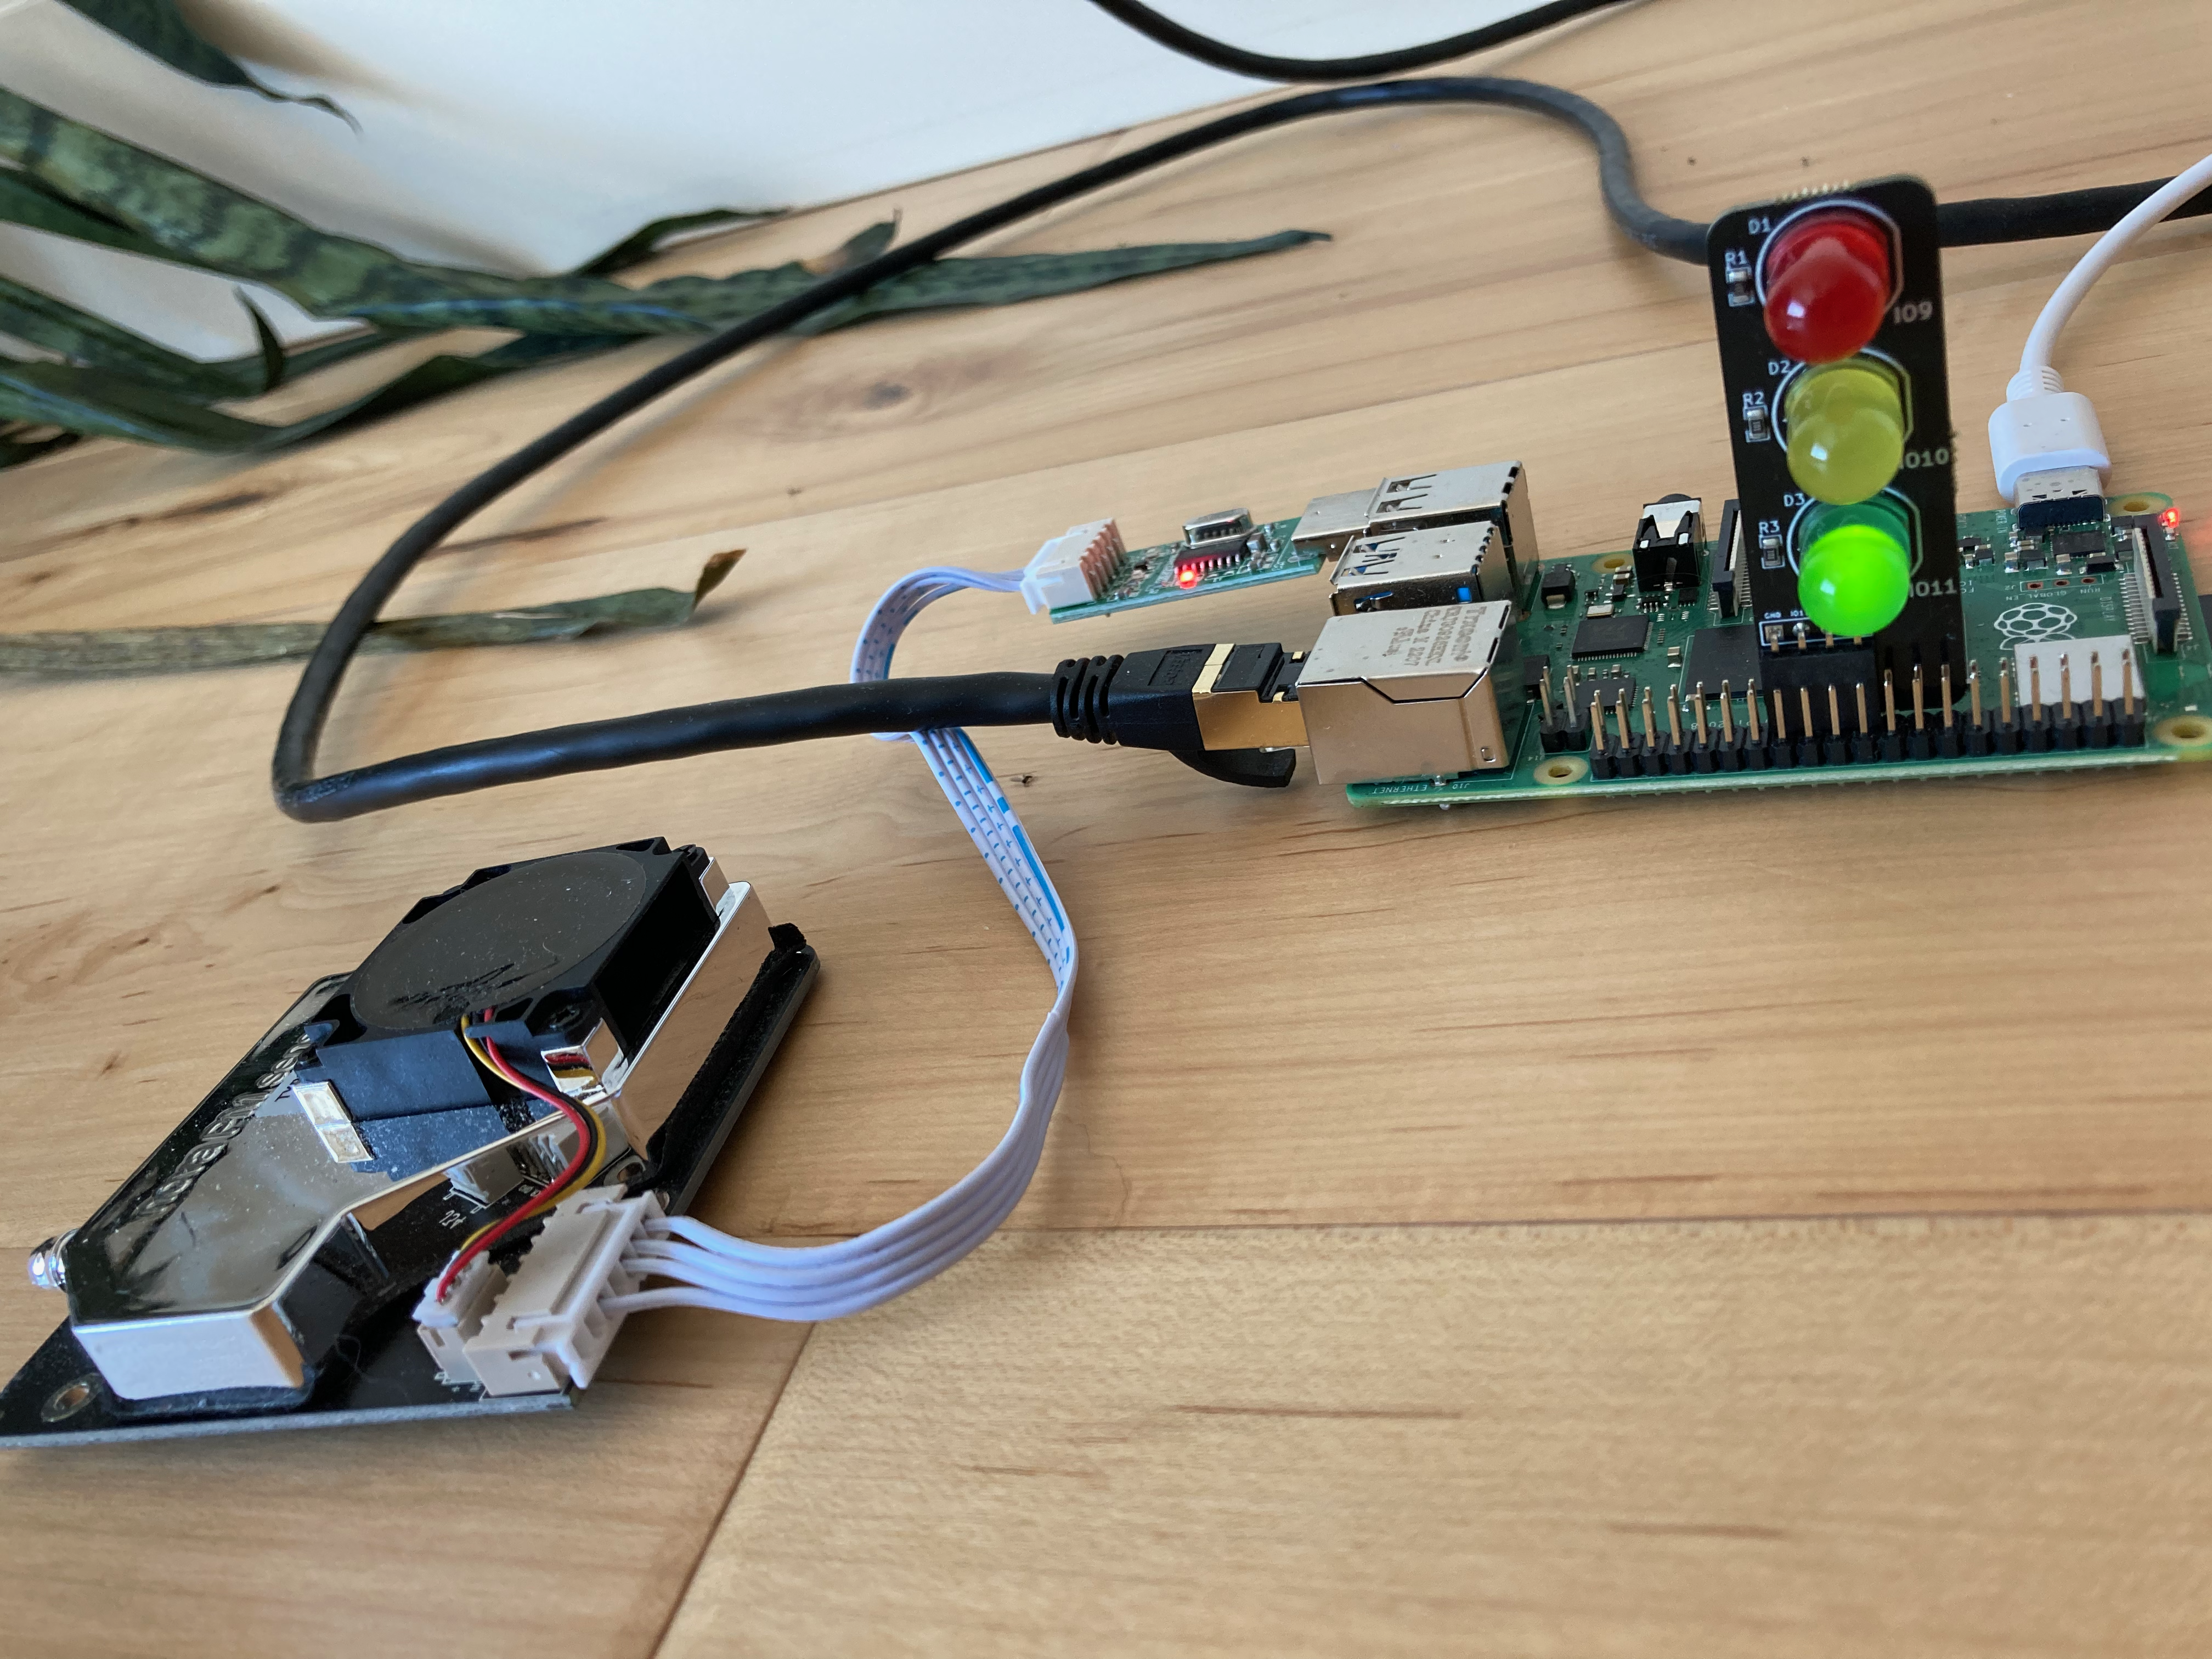
The
RPi.GPIO module is used to perform GPIO functions on the Raspberry Pi. - I've used a Pi Traffic Light to display a green light corresponding to good air quality, yellow for moderate air quality, and red for any PM2.5 or PM10 concentrations that exceed WHO guidelines.
- The correct color light can be set to on by setting the corresponding GPIO output pin to VCC and the other two GPIO putput pins connected to the traffic light to GND.
-
The
update_lights()function will set the appropriate LED light depending upon the latest air quality measurement. -
take_measurements()will run continuously in order to measure air quality every ten seconds and set the appropriate light. - If a measurement exceeds WHO guidelines, variables will be declared in order to describe the details of the measurement in a JSON payload.
-
The
requestsmodule is used to POST measurement information to the APNs back-end server, discussed next. - Print statements are used in order to test and debug the APNs server implementation.
"""
This file uses the sds011 module to control an SDS011 dust sensor for the purpose of measuring indoor air quality.
As measurements are taken, the logic contained in this file will adjust which light on the LED light strip is lit.
If a measurement exceeding WHO guidelines is taken, a push notification request will be sent to the APNs server.
"""

# Setup GPIO pins
GPIO.setmode(GPIO.BCM)
GPIO.setup(9, GPIO.OUT)
GPIO.setup(10, GPIO.OUT)
GPIO.setup(11, GPIO.OUT)


# Set all lights to off, call at light change
def reset_lights():
    GPIO.output(9, False)
    GPIO.output(10, False)
    GPIO.output(11, False)


# Set all lights to off and clean up GPIO, call at KeyboardInterrupt
def clean_exit():
    reset_lights()
    GPIO.cleanup()
    sys.exit(0)


def curr_time():
    return time.asctime(time.localtime())


def update_lights(fine, coarse):
    """
    Called as measurements occur, will set the appropriate light depending upon
    air quality measurement
    @:param float fine: PM2.5 concentration
    @:param float coarse: PM10 concentration
    """

    reset_lights()

    # poor air quality lights up red
    if fine >= 5.0 or coarse >= 15:
        GPIO.output(9, True)
        print(f"Set red light on {fine} or {coarse}")

    # moderate air quality lights up yellow
    elif fine >= 3.0 or coarse >= 10:
        GPIO.output(10, True)
        print(f"Set yellow light on {fine} or {coarse}")

    # else lights up green
    else:
        GPIO.output(11, True)
        print(f"Set green light on {fine} or {coarse}")


def take_measurements():
    """
    Collects one measurement of air quality each ten seconds.
    Sets lights appropriately.
    Contacts APNs server to request a push notification if measurement exceeds WHO guidelines.
    @:param str measurement_type: What type of measurement the file contains
    @:param int num_iterations: How many times to perform measurement before uploading
    """

    while True:
        """
        Multiple threads attempting to access the sensor at the same may result in a race condition,
        fortunately the Serial package avoids this but will throw an exception. Handle by waiting one second,
        then re-attempting the measurement.
        """
        try:
            fine_particles, coarse_particles = sensor.query()
        except SerialException:
            time.sleep(1)
            fine_particles, coarse_particles = sensor.query()

        update_lights(fine_particles, coarse_particles)

        # contact APNS server to send an alert immediately if a measurement exceeds WHO guidelines:
        if fine_particles >= 5:
            hour_minute = datetime.now().strftime("%I:%M %p")
            pollutant = "PM2.5"
            measurement = str(fine_particles)

            r = requests.post(secrets.endpoint, json={"time": hour_minute, "pollutant": pollutant, "value": measurement})

            print(f"{curr_time()}: Sent APN request with status code {r.status_code} returned")

        if coarse_particles >= 15:
            hour_minute = datetime.now().strftime("%I:%M %p")
            pollutant = "PM10"
            measurement = str(coarse_particles)

            r = requests.post(secrets.endpoint, json={"time": hour_minute, "pollutant": pollutant, "value": measurement})

            print(f"{curr_time()}: Sent APN request with status code {r.status_code} returned")

        time.sleep(10)


if __name__ == '__main__':
    atexit.register(clean_exit)
    sensor = SDS011("/dev/ttyUSB0")
    sensor.sleep(sleep=False)
    print("Preparing sensor...")
    time.sleep(15)
    print("Sensor is now running:")
    take_measurements()
Creating a back-end APNs server using Go
My favorite part of this project was getting acquainted with Go. It is always a joy to explore a new programming language, and Go is no exception. Go has become a popular language when developing RESTful and gRPC APIs for a few reasons, not the least of which is its amazing support for concurrency and excellent documentation. In this project, I have used modules that abstract away a lot of the concurrency management, but I hope to explore this feature of Go very soon.
At this point, it is helpful to describe why exactly a back-end web server is necessary to send push notifications to the iOS app. Apple provides official guidance on how to register iOS devices to receive push notifications, which has already been described on this page. Apple also provides instructions on how to send notification requests to APNs, which is Apple's own back-end server responsible for receiving notification requests and potentially sending iOS devices notifications. My own back-end server was required as an intermediary between the Raspberry Pi and the APNs gateway for several key reasons described by Apple in the link above:
-
A connection to APNs must occur via HTTP2. The Python
requestsmodule does not yet support HTTP2 connections. - Requests sent to APNs must all include a unique device token corresponding to an iOS device. This token is generated on an iOS device when the app is launched and is intended to be sent to a web server.
- When sending requests using tokens, a JSON web token (JWT) is also used to authenticate the request being sent to APNs as belonging to a particular development team. The JWT is created using a key file provided by Apple specific to a given entitlement, a development team ID (linked to the developer profile that signs the app), and a key ID corresponding to the key provided by Apple.
- Generating a JWT is a cryptographic procedure. Instead of trying my own implementation at performing this complex task, I've decided to use a Go module with excellent reputation.
-
The
main.gofile shown to the right is the entry point for this Go application. -
Here a
limitervariable is defined. This sets a rate of once every twenty minutes. - This limiter is used to prevent the Raspberry Pi from sending requests to APNs every ten seconds during periods of poor air quality. Receiving an alert every ten seconds will not please most users.
- During prolonged periods of poor air quality, users will receive alerts at most three times per hour.
-
The
limit()function is used to respond to the Raspberry Pi with HTTP status code 429 (too many requests) in the event that it attempts to send a notification more than once every twenty minutes. -
The
main()function callshandleCrypto()andreadTokensFromFile()which will be discussed later. These functions involve decrypting any previously stored device tokens into memory, or setting up encryption capability if this hasn't already been done. -
Two endpoints are defined using the
httppackage, the root endpoint (/) will callcreateNewToken(), defined in a separate file and discussed in the next section. -
The
/notifyendpoint will be used to forward JSON data describing an offending measurement to APNS.
package main

import (
	"fmt"
	"log"
	"net/http"
	"time"

	"golang.org/x/time/rate"
)

/*
Entry point for an application that stores device tokens (encrypted) and sends these registered
devices a push notification describing an air quality measurement that exceeded World Health Organization
guidelines.

Logic implementing rate limiting has been implemented so that the RaspberryPi may not send an APNs
request more than every 20 minutes.
*/

// limit push notifications to every 20 minutes
var limiter = rate.NewLimiter(rate.Every(1*time.Hour/3), 1)

func limit(limited http.HandlerFunc) http.HandlerFunc {
	return func(res http.ResponseWriter, req *http.Request) {
		if limiter.Allow() == false {
			http.Error(res, http.StatusText(429), http.StatusTooManyRequests)
			return
		}
		limited.ServeHTTP(res, req)
	}
}

func main() {
	handleCrypto(&key) // see encryption.go

	readTokensFromFile()                           // see tokens.go
	fmt.Println("All tokens (from file):", tokens) // Prints all currently registered tokens present in tokens.data

	http.HandleFunc("/", createNewToken)
	http.HandleFunc("/notify", limit(sendPushNotificationToAllTokens))

	log.Fatal(http.ListenAndServe("0.0.0.0:5050", nil))
	//log.Fatal(http.ListenAndServeTLS(":5050", "localhost.crt", "localhost.key", nil)) // support TLS when available
}
-
The
tokens.gofile shown to the right is used to implement logic controlling how tokens are received, stored, and retrieved from the local file system. -
A
tokenobject is defined that contains one member: a string corresponding to a device ID. - iOS devices register a token each time that they launch this app, and an APNs request will be sent to all tokens in the token store; therefore, it is necessary to define a function that will remove duplicate tokens, thereby creating a set of unique tokens.
-
The
createNewToken()function maps the JSON entity posted by the iOS application to a new token to be stored on the web server. -
This function will also append the token to the list, currently stored in memory, of all
tokens and
call
removeDuplicateTokens()before sending an HTTP Status Code 201 (Item Created). to the iOS device. -
The
createOrUpdateTokenFile()function will attempt to write the list of tokens stored in memory to a file to be stored on the local file system. -
Note that tokens are encrypted via a call to
encryptToken(), this function will be explored in a later section. -
Lastly, the
readTokensFromFile()function is called when the application first launches. It will search for atokens.datafile and if one is found it will decrypt the tokens stored therein into memory. If this file does not exist, it will be created.
package main

import (
	"encoding/csv"
	"encoding/json"
	"errors"
	"fmt"
	"log"
	"net/http"
	"os"
)

/*
This file contains logic required to register device tokens when the root endpoint is contacted
and also to read contents of a file containing encrypted tokens at application startup.
*/

// Represents a token corresponding to an iOS device
type token struct {
	ID string
}

// A slice of all tokens
var tokens []token

// Devices register at application startup, ensure that all tokens are unique to avoid sending duplicate alerts
func removeDuplicateTokens(tokenSlice []token) []token {
	keys := make(map[token]bool)
	var set []token
	for _, token := range tokenSlice {
		if _, value := keys[token]; !value {
			keys[token] = true
			set = append(set, token)
		}
	}
	return set
}

// Called when the root endpoint is contacted
// Expects to receive POST data describing an iOS device token
func createNewToken(res http.ResponseWriter, req *http.Request) {

	var newToken token

	decoder := json.NewDecoder(req.Body)

	if err := decoder.Decode(&newToken); err != nil {
		log.Println("Could not create new token from request body: ", err)
		return
	}

	tokens = append(tokens, newToken)
	tokens = removeDuplicateTokens(tokens)
	createOrUpdateTokenFile(newToken)
	res.WriteHeader(http.StatusCreated)            // respond with status code 201
	fmt.Println("All tokens (in memory):", tokens) // Prints all currently registered tokens
}

/*
Called by createNewToken() in order to append the new token to a CSV list of all
tokens stored on local filesystem. This function checks if the file exists,
and if it does not, it is created.
*/
func createOrUpdateTokenFile(t token) {
	file, err := os.OpenFile("tokens.data", os.O_CREATE|os.O_RDWR|os.O_APPEND, 0600)
	if err != nil {
		log.Println("Error accessing file:", err)
	}

	defer file.Close()

	log.Println("Writing token to file...")
	encoder := csv.NewWriter(file)

	encrypted := encryptToken(t)
	encoder.Write([]string{encrypted})
	encoder.Flush()
	err = encoder.Error()
	if err != nil {
		log.Println(err)
	}

}

/*
Called at application startup. If no token file is present, it will be created.
Otherwise, the contents of the file are read to the tokens slice in memory.
*/
func readTokensFromFile() {
	if _, err := os.Stat("tokens.data"); errors.Is(err, os.ErrNotExist) {
		log.Println("Token file not found... Creating one...")
		file, err := os.Create("tokens.data")
		if err != nil {
			log.Println("Error creating token file:", err)
		}
		defer file.Close()
	} else {
		file, err := os.Open("tokens.data")
		if err != nil {
			log.Println("Error opening file:", err)
		}

		defer file.Close()

		reader := csv.NewReader(file)
		for err == nil {
			var s []string

			s, err = reader.Read()
			if len(s) > 0 {
				decrypted := decryptToken(s[0])
				tokens = append(tokens, token{ID: decrypted})
			}
		}

		tokens = removeDuplicateTokens(tokens)
	}
}
-
The
apns.gofile shown on the right is responsible for performing the work of creating and sending a push notification request to Apple's APNs server. -
An
alertstruct is defined that will hold data members expected to be sent by the Raspberry Pi upon measuring air quality that has exceeded WHO guidelines on particle concentration. -
The
sendPushNotificationToAllTokens()function will decode the JSON contained in the request body, this is the alert information sent by themonitor.pyscript, and create a newalertobject from this data. - The signing key provided by Apple specific to the entitlement created allowing this app to send push notifications is loaded from file.
- The signing key will be combined with my development team ID and the signing key ID to generate a JWT.
- An alert title and payload is defined that describes the alert that the user will see on their device. (An example demonstrating this is shown below)
- A push notification request is sent to APNs requesting that each iOS device represented by a token in the token list be sent an alert containing the data sent by the Raspberry Pi.
- The web server will respond to the Raspberry Pi with HTTP Status Code 201, "Item Created."
package main

import (
	"encoding/json"
	"fmt"
	"log"
	"net/http"

	"github.com/sideshow/apns2"
	PAYLOAD "github.com/sideshow/apns2/payload"
	APNS "github.com/sideshow/apns2/token"
)

/*
This file contains the definition of an alert struct and a methods used to send a push notification request
to Apple Push Notification services (APNs). The alert struct is used to hold information received from the
RaspberryPi describing a measurement that exceeded World Health Organization's guidelines on air quality.
This information is bound to the alert struct from a POST request containing JSON data when the /notify endpoint is
contacted. See main.go for further context.
*/

// Represents alert information received from RaspberryPi
// Used to display information about a specific measurement
type alert struct {
	Time      string `json:"time"`
	Pollutant string `json:"pollutant"`
	Value     string `json:"value"`
}

// Called when the /notify endpoint is contacted
// Binds posted JSON to a new alert struct
// Creates APNs request from alert struct
func sendPushNotificationToAllTokens(res http.ResponseWriter, req *http.Request) {
	var newAlert alert

	decoder := json.NewDecoder(req.Body)

	if err := decoder.Decode(&newAlert); err != nil {
		log.Println("Could not create new alert frpm request body:", err)
		return
	}

	// load signing key from file
	authKey, err := APNS.AuthKeyFromFile("apnkey.p8")
	if err != nil {
		log.Println("Token Error:", err)
	}

	// Generate JWT used for APNs
	requestToken := &APNS.Token{
		AuthKey: authKey,
		KeyID:   signingKey,
		TeamID:  teamID,
	}

	// Construct alert information from alert struct
	alertSubtitle := fmt.Sprintf("%s of %s measured %s", newAlert.Pollutant, newAlert.Value, newAlert.Time)
	payload := PAYLOAD.NewPayload().Alert("Air Quality Alert").AlertSubtitle(alertSubtitle)

	// Ensure all tokens are unique before sending an alert to each device they correspond to
	tokenSet := removeDuplicateTokens(tokens)
	for i := range tokenSet {
		notification := &apns2.Notification{
			DeviceToken: tokenSet[i].ID,
			Topic:       "com.harr1424.AirQuality",
			Payload:     payload,
		}

		client := apns2.NewTokenClient(requestToken)
		result, err := client.Push(notification)
		if err != nil {
			log.Println("Error Sending Push Notification:", err)
		}
		log.Println("Sent notification with response:", result)
	}
	res.WriteHeader(http.StatusCreated) // respond with status code 201
}
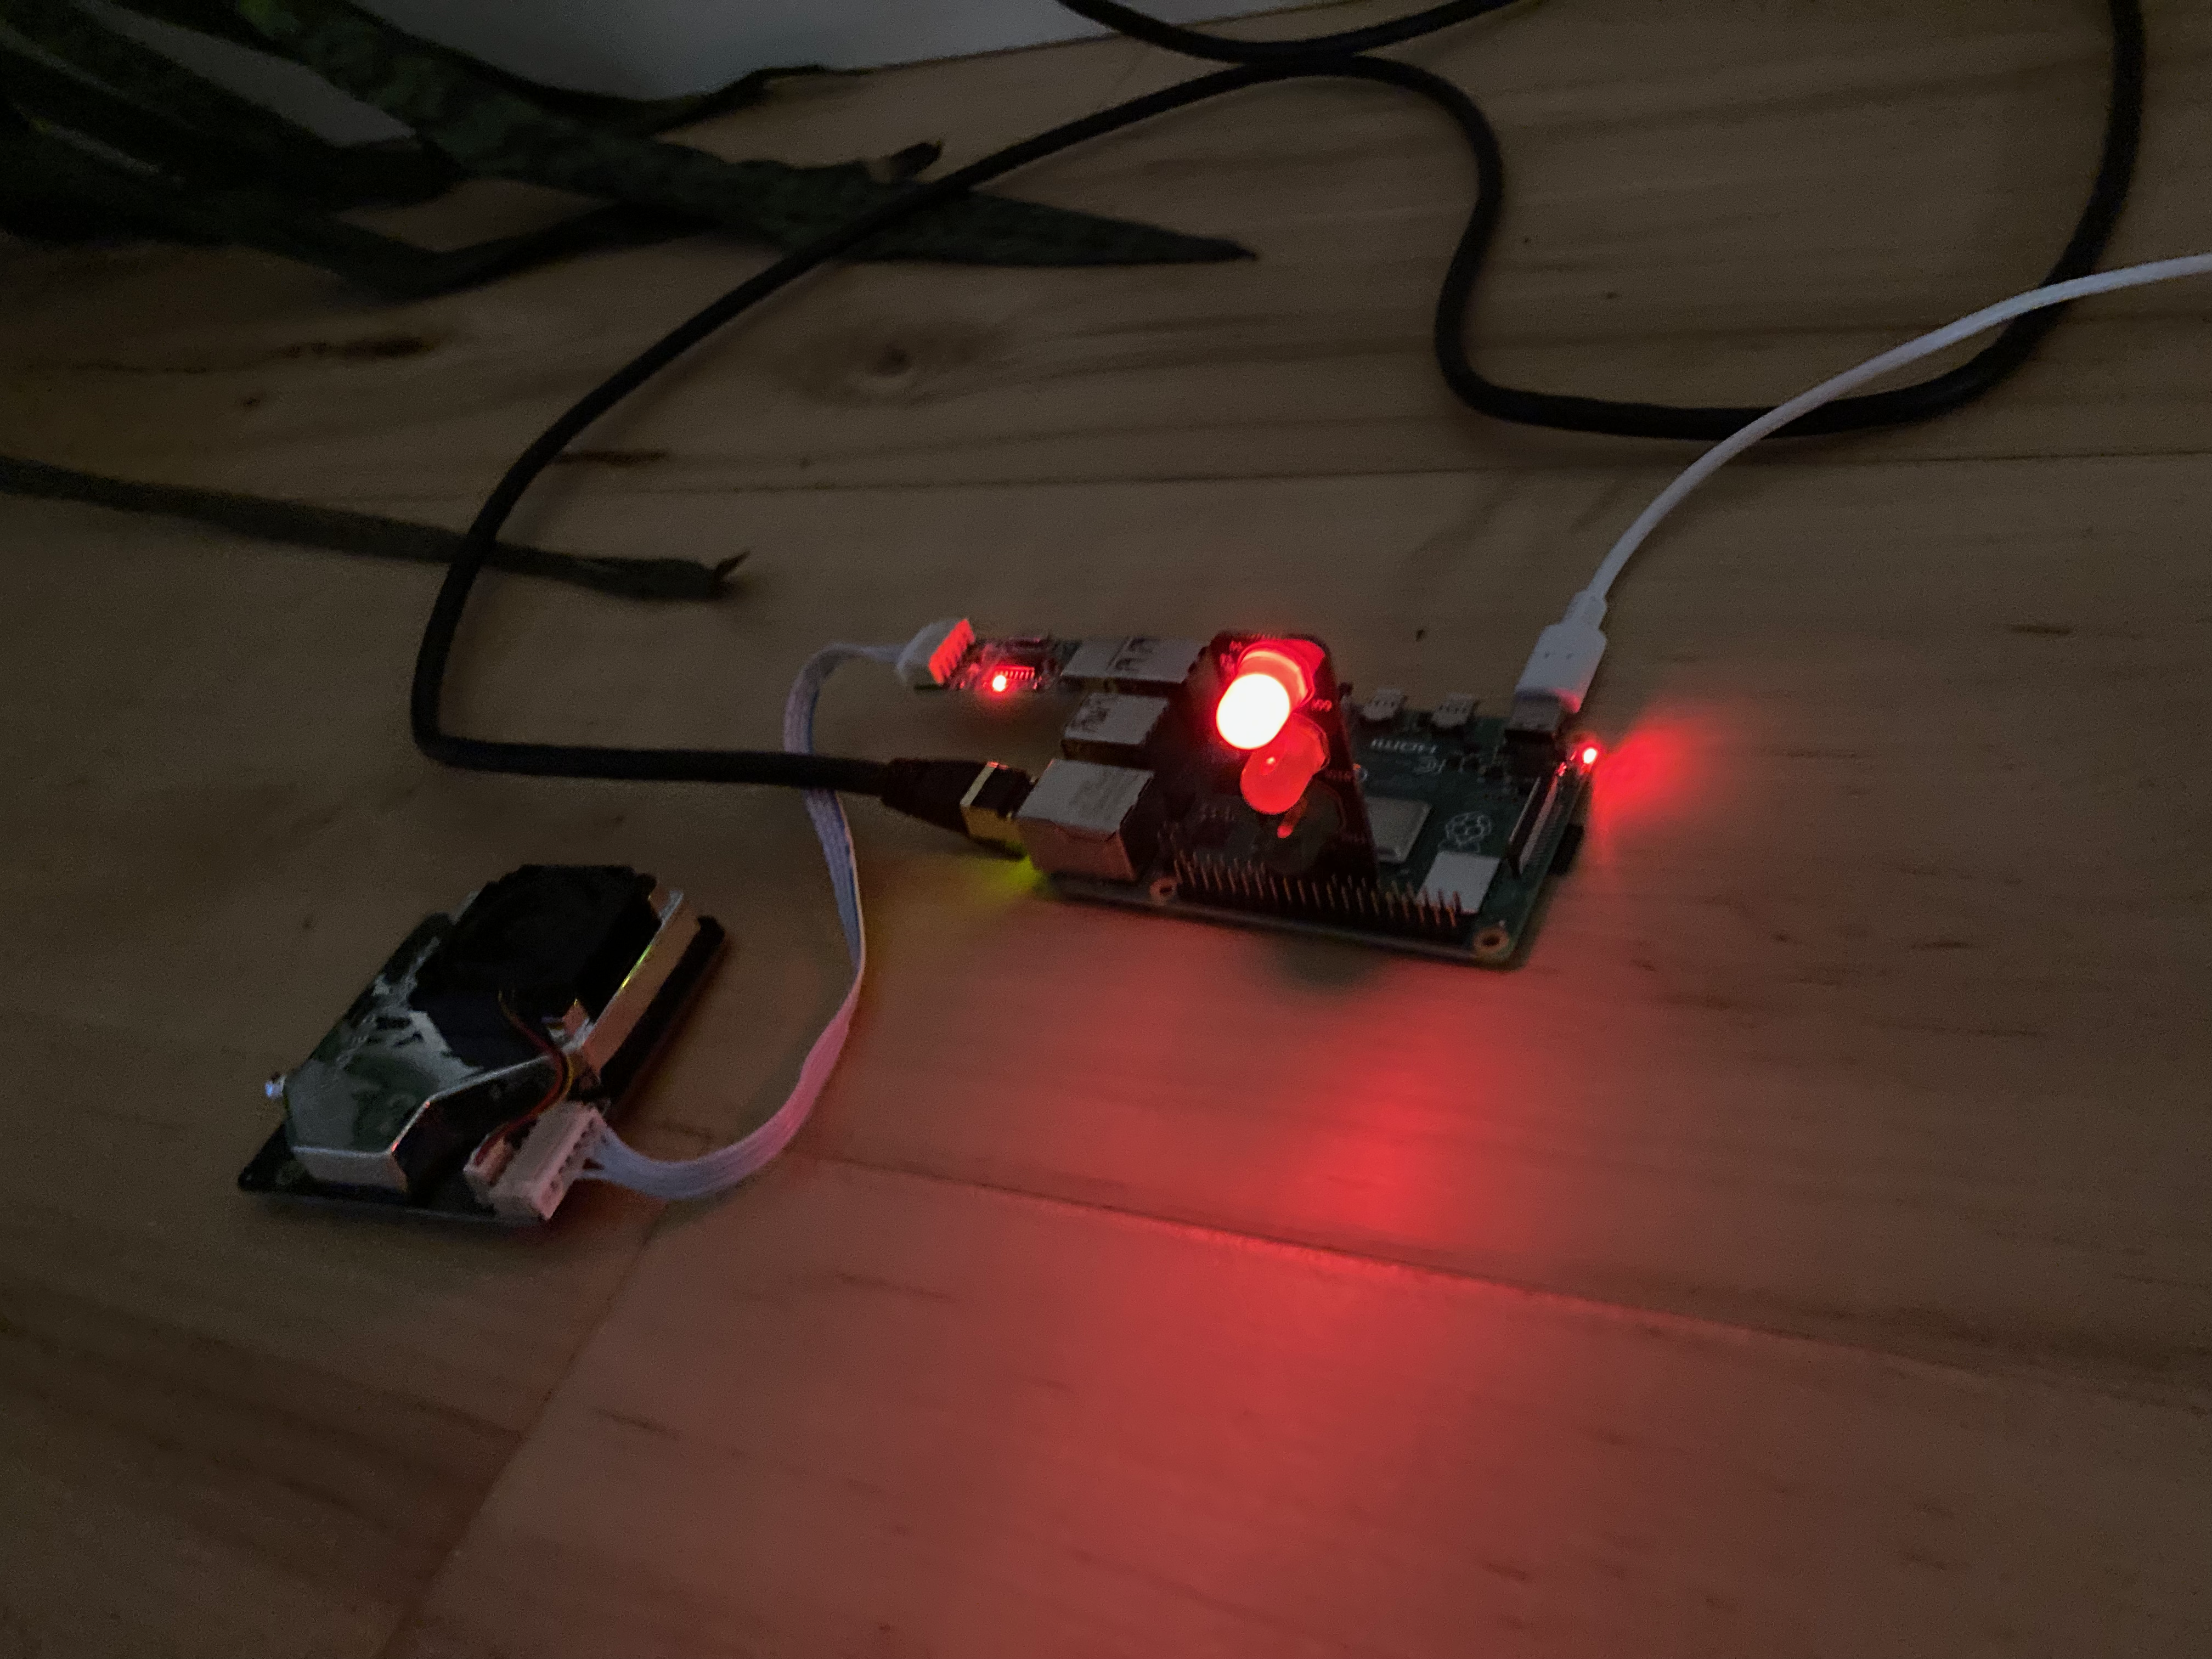
Immediately after an offensive measurement, the monitor.py script will illuminate
the
red light
and begin sending alert requests to the back-end server every ten seconds. One of these requests
will be forwarded to APNs every twenty minutes, as
shown in the iOS screenshot below:
During the day, air quality was good.
Air quality worsened late afternoon.
The final component of the back-end web server is the encryption.go file. This file
is
responsible for encrypting token IDs written to the
local file system. Encryption and decryption requires a key, and for the sake of this project
the
key was stored in the local filesystem along
with the tokens.data file. This is not a good idea in a production web server,
because
if an attacker gained access to the tokens.data file then they
also have access to the key and can easily decrypt the tokens. An ideal solution would be to
store
the key using a cloud hosted key management service,
offered by all major cloud providers today. However, storing the key locally made it easier to
test
and debug my own attempt at encrypting the data.
-
The function
encryptToken()accepts as an argument atokenand will return a hex-string representation of this token after it has been encrypted. - It is important that the nonce used in AES GCM encryption is unique each time that encryption is performed, so this function will also generate a sequence of 96 random bits into a byte slice that will be used in the encryption process.
- The key used for all encryption and decryption procedures is read from memory.
- The nonce used to encrypt a given token is prepended to the encrypted representation of that token, allowing it to be used for the decryption process.
-
The byte slice containing the nonce and encrypted token are returned as a hexadecimal
string
which will be
written to the
tokens.datafile. -
The logic of writing to and reading from this file is described in
tokens.go. Functions defined in this file call the encryption functions here. -
The
decryptToken()function essentially reverses the process described above. - The hex-string is read from a file and passed to the function as an argument.
- The nonce and encrypted token are separated by reading the hex-string into a byte slice and indexing the nonce and token bytes respectively.
- AES GCM decryption is performed on the encrypted token using the nonce.
- The original token, represented as a string, is returned.
-
The function
handleCrypto()is responsible for creating a key and key file if it does not exist. - If the file does exist, the value of the key is read into memory.
package main

import (
	"crypto/aes"
	"crypto/cipher"
	"crypto/rand"
	"encoding/hex"
	"errors"
	"log"
	"os"
)

/*
This file contains logic to encrypt a token before it is stored on the local filesystem,
and decrypt tokens read from a file. A key and nonce are defined in order to perform AES-GCM
authenticated encryption.

IMPORTANT: The key is written to a local file.
Whenever possible, it should be stored in a more secure location,
separate from the data that it encrypts.
*/

var key = make([]byte, 32)

func encryptToken(t token) string {
	original := t.ID // ID is string member of token
	var nonce = make([]byte, 12)

	// read random bytes into nonce
	_, err := rand.Read(nonce)
	if err != nil {
		log.Println("Error reading random bytes into nonce:", err)
	}

	block, err := aes.NewCipher(key)
	if err != nil {
		log.Println("Error creating cipher during encrypt:", err)
	}

	aesgcm, err := cipher.NewGCM(block)
	if err != nil {
		log.Println("Error creating GCM during encrypt:", err)
	}

	ciphertext := aesgcm.Seal(nil, nonce, []byte(original), nil)

	// prepend the ciphertext with the nonce
	out := append(nonce, ciphertext...)

	return hex.EncodeToString(out)
}

func decryptToken(s string) string {
	// read hex string describing nonce and ciphertext
	enc, err := hex.DecodeString(s)
	if err != nil {
		log.Println("Error decoding string from hex:", err)
	}

	// separate ciphertext from nonce
	nonce := enc[0:12]
	ciphertext := enc[12:]

	block, err := aes.NewCipher(key)
	if err != nil {
		log.Println("Error creating cipher during decrypt:", err)
	}

	aesgcm, err := cipher.NewGCM(block)
	if err != nil {
		log.Println("Error creating GCM during decrypt:", err)
	}

	original, err := aesgcm.Open(nil, nonce, ciphertext, nil)
	if err != nil {
		log.Println("Error decrypting to string:", err)
	}
	originalAsString := string(original)

	return originalAsString
}

func handleCrypto(key *[]byte) {
	if _, err := os.Stat("key.key"); errors.Is(err, os.ErrNotExist) {
		log.Println("Key file not found. Creating one...")
		key_file, err := os.OpenFile("key.key", os.O_CREATE|os.O_WRONLY, 0600)
		if err != nil {
			log.Println("Error creating file:", err)
		}

		defer key_file.Close()

		_, err = rand.Read(*key)
		if err != nil {
			log.Println("Error creating key:", err)
		}

		_, err = key_file.Write(*key)
		if err != nil {
			log.Println("Error writing key to file:", err)
		}

	} else {
		log.Println("Crypto files found, attempting to read...")
		key_file, err := os.OpenFile("key.key", os.O_RDONLY, 0644)
		if err != nil {
			log.Println("Error accessing key file:", err)
		}

		defer key_file.Close()

		_, err = key_file.Read(*key)
		if err != nil {
			log.Println("Error reading key from file:", err)
		}
	}

}
That's it! On this page I have demonstrated the process of taking air quality measurements using an SDS011 sensor and a Raspberry Pi. The Raspberry Pi can be programmed to upload measurements to cloud storage and also to send push notification requests to an intermediary back-end web server in order to send push notifications to an iOS app. This iOS app has been created by defining views and incorporating the Firebase SDK, useful for retrieving data from cloud storage in order to visualize it using Swift Charts. Push notifications have been implemented according to Apple's official recommendations. Additionally, I have demonstrated how an API can be created and contacted from within the iOS app in order to analyze measurement data and potentially display an alert to the user, but as discussed above this is not as ideal as implementing push notifications.
I hope you have enjoyed this write-up. This project is intended to demonstrate a prototype of an indoor air quality monitoring system that could be well suited for home consumer use. This would require several improvements, most notably:
-
Supporting TLS on the back-end APNs web server to transmit device tokens securely. The code
in
main.goalready demonstrates that this is possible, but would require a TLS certificate signed by a Certificate Authority. - Storing the encryption key used in the back-end web server in a more secure location, ideally incorporating a major cloud provider's key management service.
- Allowing the iOS app user to select a notification interval instead of only allowing notifications every 20 minutes.
- When transmitting tokens at application launch, also transmitting the user's chosen notification interval setting so that the back-end web server can rate limit notification requests to each device appropriately.
- Minor UI improvements to the iOS app.