Creating a hidden service using Tor on a Raspberry Pi
This page is focused on installing Ubuntu Server LTS on a Raspberry Pi, hardening the Pi, and hosting a hidden service using Tor. I first heard of Tor while I was in high school, and always associated it with Julian Asange and Wikileaks. Tor was originally a U.S. Naval Research Laboratory project developed in order to allow for anonymous transmission of classified materials and diplomatic cables, and while it provided anonymity, this was a time when SSL was only used on secure payment gateways and consequently the traffic exiting the Tor network en route to its final destination was able to be intercepted by activists. Thus Wikileaks was born as Asange claimed in 2010 that he had intercepted over one million documents by eavesdropping on a Tor exit node (Wired). More information about Tor's history can be found on Wikipedia.
Today Tor is usually associated with content of questionable legality such as dark net
marketplaces
and
online forums:

Interestingly, organizations not normally associated with the above
such as The
New York Times, BBC, and
the CIA also operate
hidden
services.
This allows people living in countries where governments heavily censor the internet to
access these
sites anonymously. What if someone wanted to visit this website or your own website
anonymously?
Read on to find out how to support this.
Hardening a Raspberry Pi
Before we get into Tor, it is important to consider that a hidden service is essentially an ordinary web server, but is accessed via a series of anonymizing circuits which provide anonymity. Any webserver will necessarily be exposed to the public internet in order to receive requests and send responses. Prior to exposing my Raspberry Pi to a deluge of port scanning and brute-force authentication attempts I wanted to do everything possible to avoid my Pi mining crypto or much worse.
Most Raspberry Pi enthusiasts interface with their boxes using SSH for an interactive
terminal shell
or VNC if they prefer a desktop environment. I won't be covering
VNC at all here, and will defer again to Wikipedia to explain the inner workings of SSH. SSH
supports
password and
public-key authentication, however password based authentication can quickly be brute-forced
using a
tool like Hydra,
therefore I am going to configure my Pi to only use public key authentication when I flash
the OS.
Prior to running Raspberry Pi Installer,
I am going to create an ed25519 key pair (read more about asymmetric encryption
here). I
chose ed25519 because it is what GitHub
recommends when configuring a SSH key for their site, but RSA is likely fine if you
use 1024
bits.
The image below demonstrates using the ssh-keygen tool to create such a key pair:
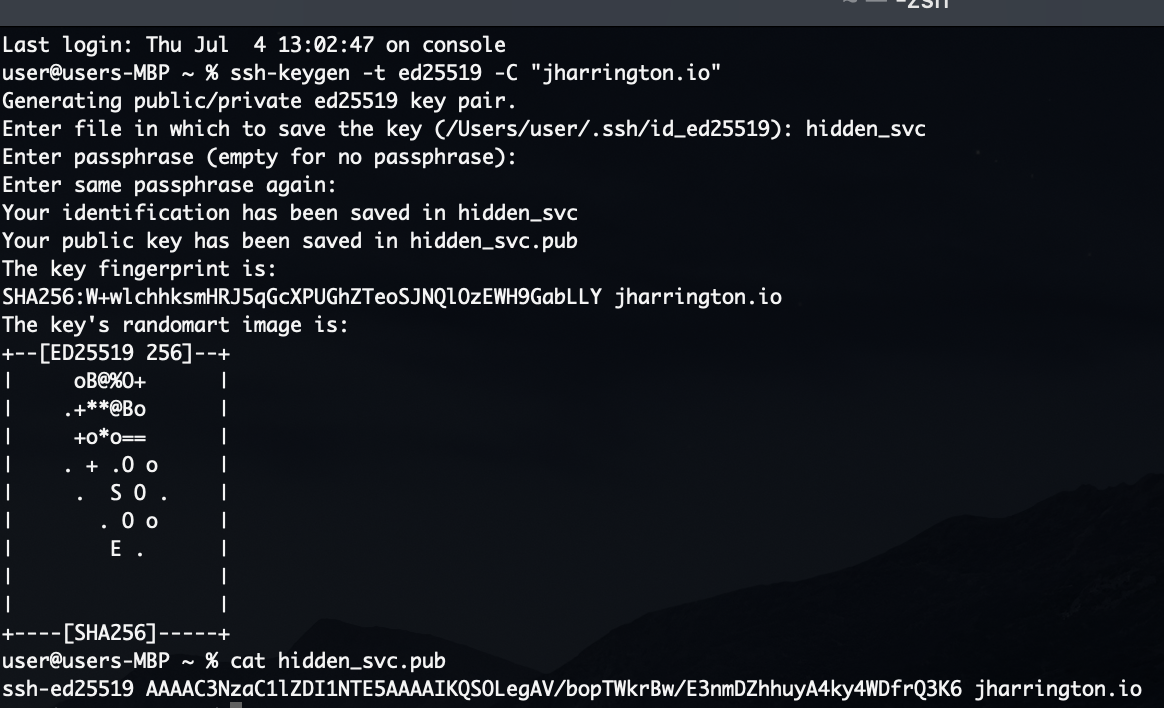
Note that I used cat to output the contents of the public key so that I can
paste it in
the next step. Always leave the private key (the file .pub)
somewhere safe, but
take note of where it has been created on your local filesystem as we will supply its
absolute path
in a future step.
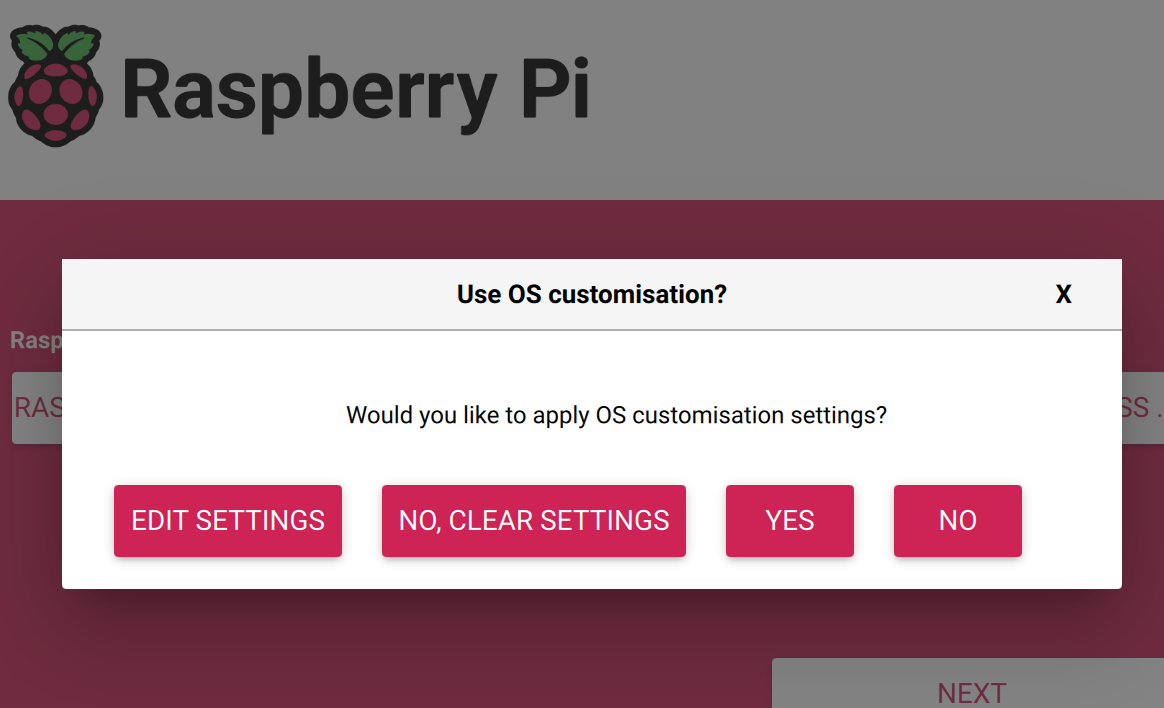
When running the Raspberry Pi Installer, select "Edit Settings" when prompted:
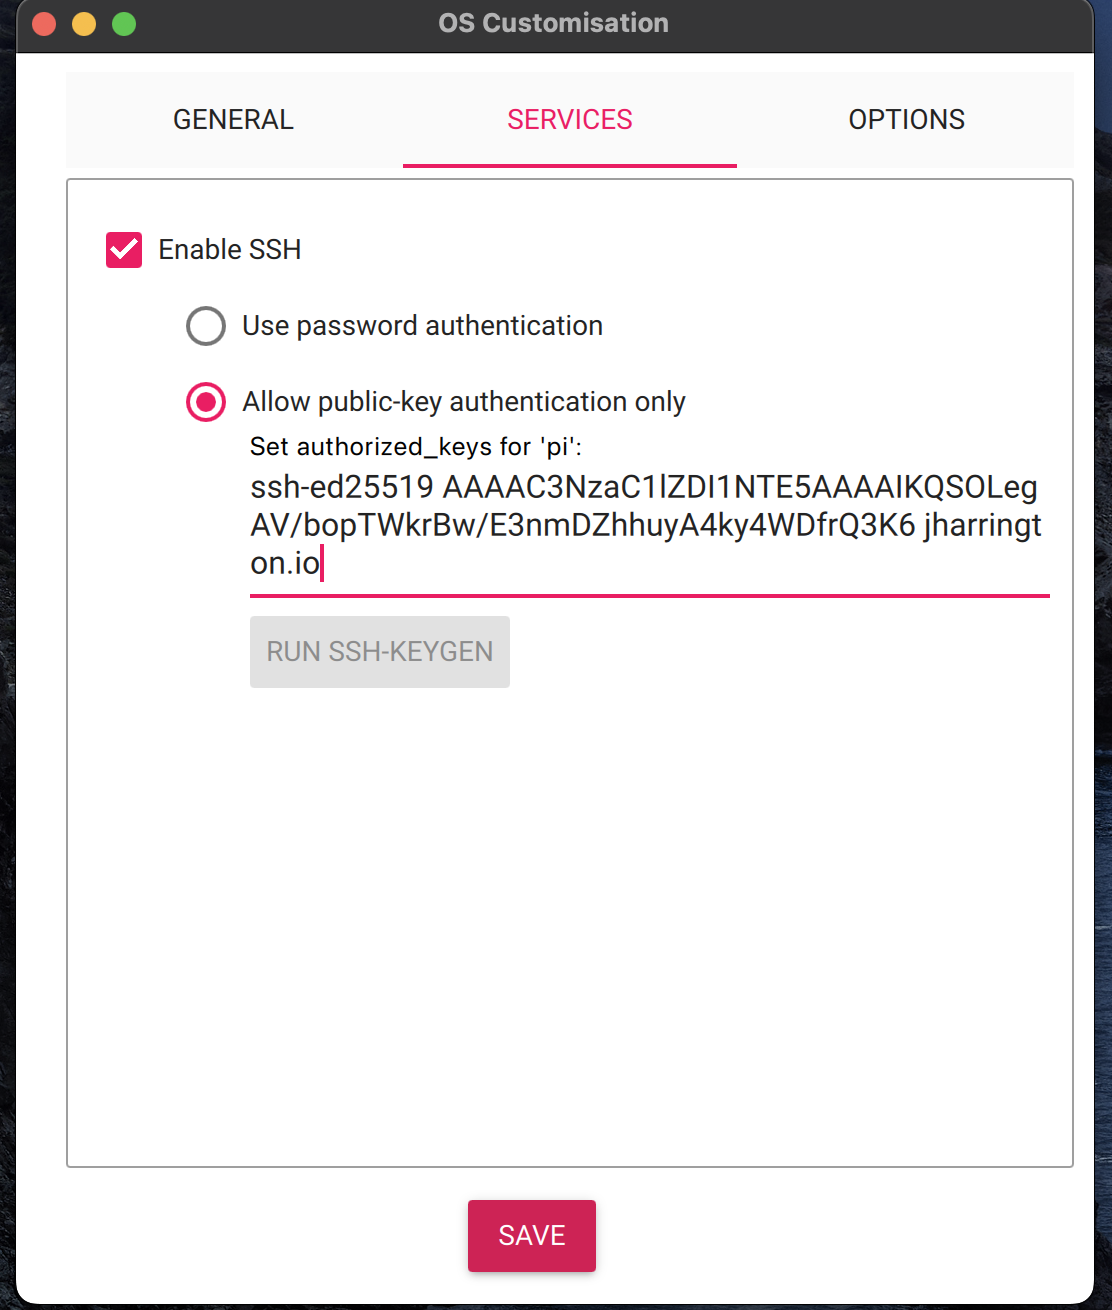
And then paste the public key as shown below:
Now we are all set to boot up the Pi and SSH in from the LAN:
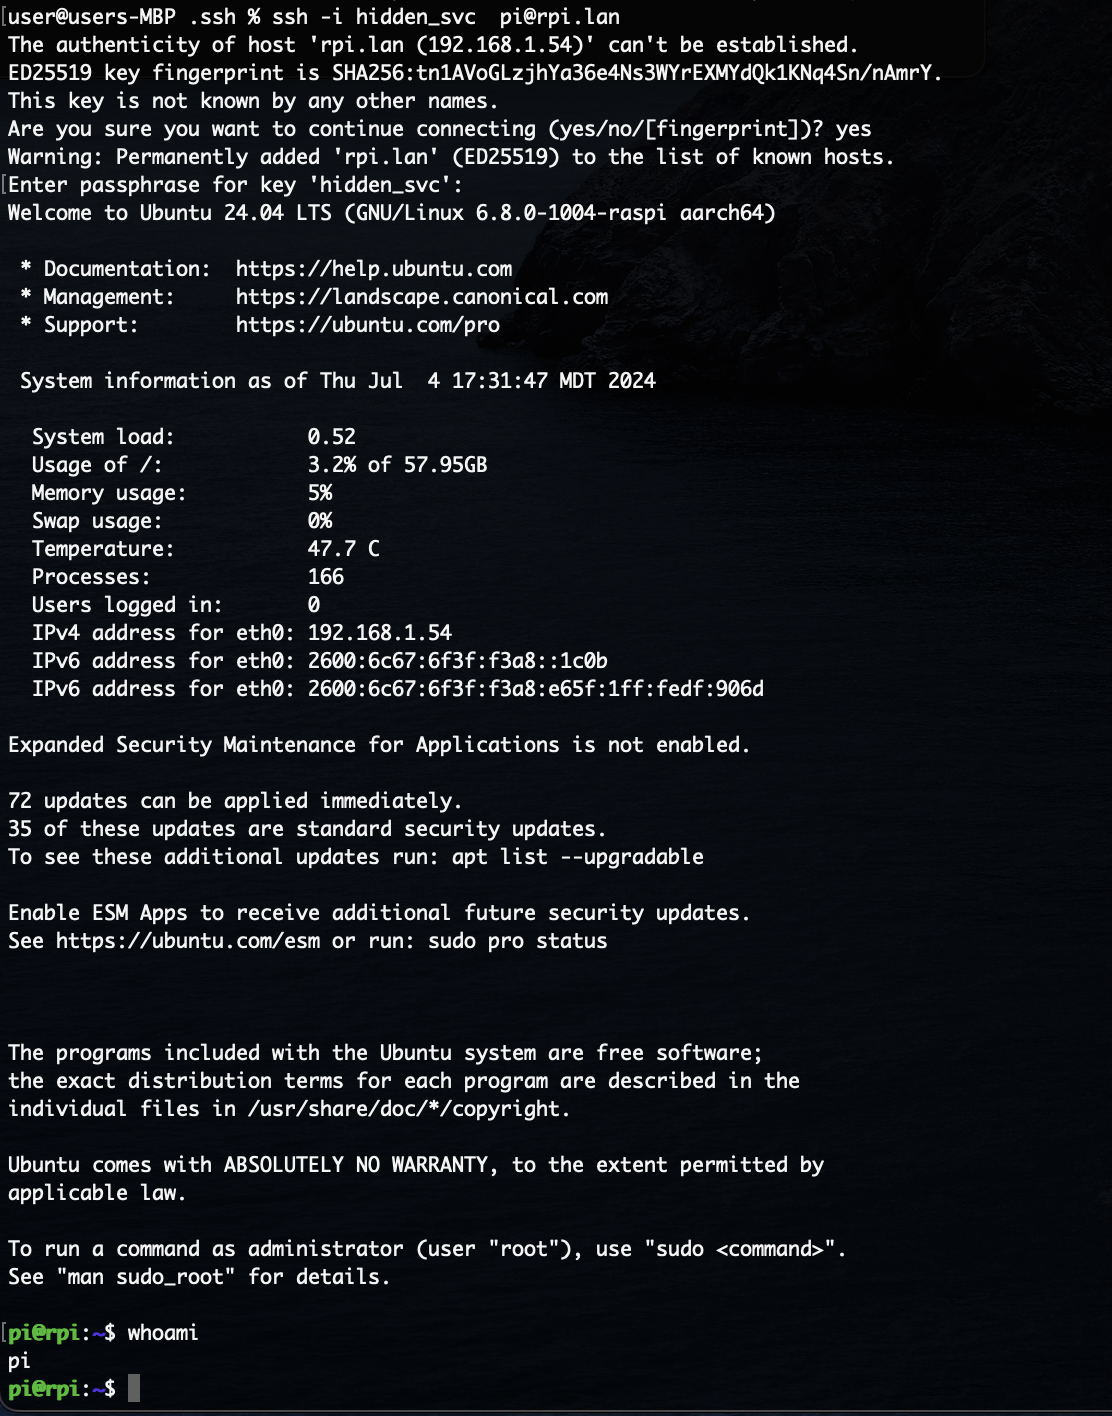
The screenshot shows how I used the -i flag to specify the path to the private key, this
corresponded to the public key already placed on the Pi during installation and so the
authentication succeeded.
As the successful login showed, our Pi is ready for updates. This is a crucial part of
ensuring a
secure OS. I ran sudo apt update && sudo apt upgrade -y to begin this process.
Once
finished, I then
installed fail2ban, a tool which will
temporarily
ban IP addresses after a set number of failed authentication attempts. I ran
sudo apt install fail2ban
and then made some minor configuration changes. First I copied the jail.conf
file which
defines the logic for banning offenders to a jail.local file, per the
instructions at
the top of the jail.conf
file. Next I used vim to edit the local file, searching for "sshd" and adding two statements
to the
defaults in that block:

I used nmap to confirm that no other services were running on
exposed
ports and
also attempted a password based authentication:

Not good! Despite configuring the Pi to use only public key authentication, we are still
able to
attempt a password based authentication.
I examined the SSH config file to find the problem and there were a lot. I am really glad I
checked
this, as by default the configuration
was set to allow a lot of undesirable behavior such as root login and X11 forwarding. Below
are the
changes I made to sshd_config:
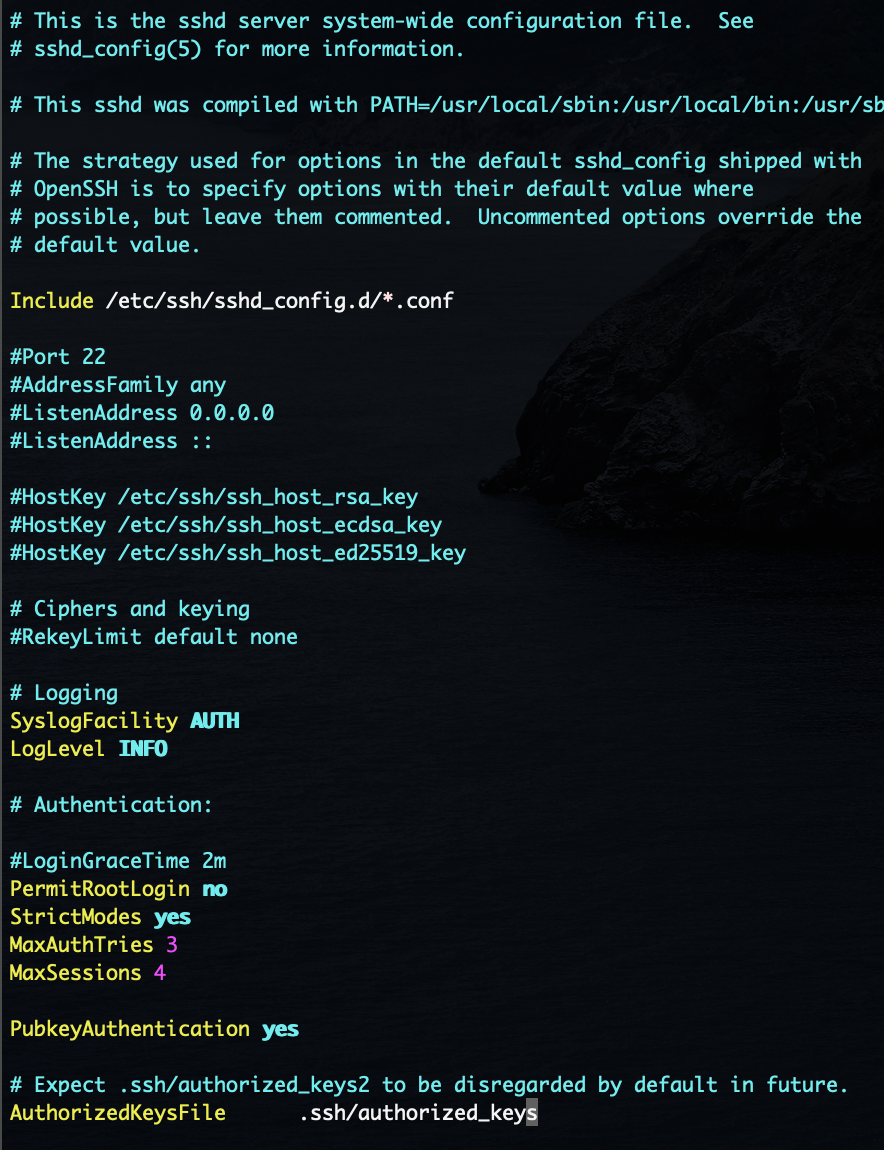
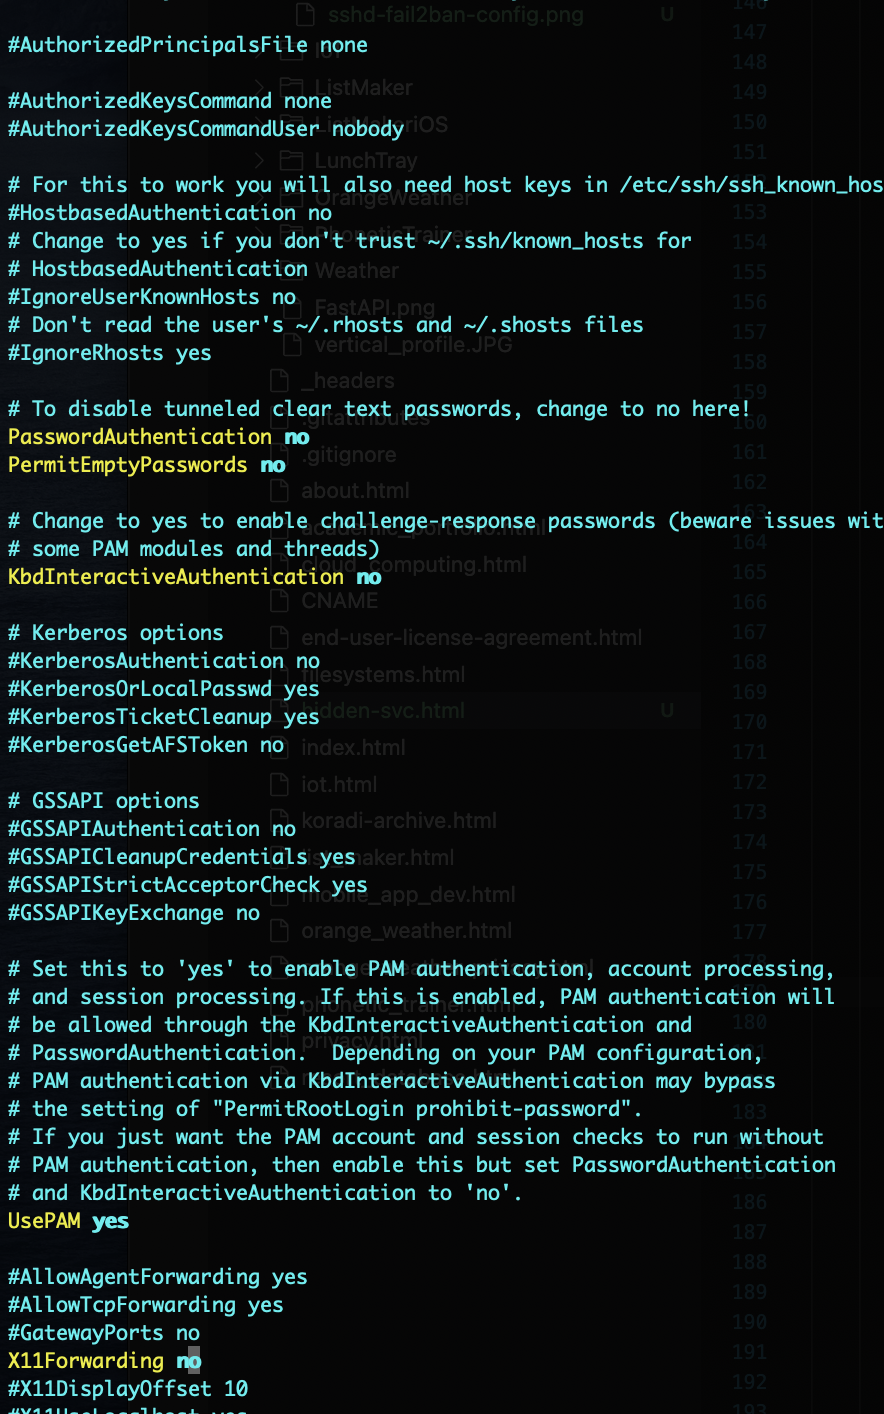
Very important: I added a authorized_keys file and pasted in the public key
generated a
few minutes ago. From the .ssh directory I ran
sudo vim authorized_keys and pasted in the full output of
cat hidden_svc.pub into the file. Next I ran
sudo chmod 644 ~/.ssh/authorized_keys && sudo chown pi:pi ~/.ssh/authorized_keys
to set appropriate permissions on the file. Lastly, confirm that you have uncommented the
line in
sshd_config that begins with "AuthorizedKeysFile".
I ran sudo systemctl restart ssh to load the new configuration and verified
password
based authentication was no longer possible:

I also checked to make sure that I could still SSH into my pi using the private key after so
many
configuration changes, and I could.
Finally I installed rfkill to disable all wireless interfaces on my Pi. I have the Pi
connected to
my LAN via ethernet cable and have no need for wireless services.
sudo apt install rfkill && sudo rfkill block all && sudo rfkill list
With this work finished I am reasonably comfortable with my Pi connected to the network
24/7. I
should also add that I was able to configure my router's security rules to drop all incoming
connections on Port 22, the port SSH is listening on my Pi.
Getting Back to Tor
The Tor project provides instructions on
setting up
a Tor service. Like any website, it will
require a web server. Tor provides instructions for both NGINX and Apache which are the most
common. I decided to follow instructions for Apache:
sudo apt install apache2. Next, not mentioned in the official instructions, but
very relevant is that we want our server to only ever listen for connections
on localhost: sudo vim /etc/apache2/ports.conf and make edits as shown below:
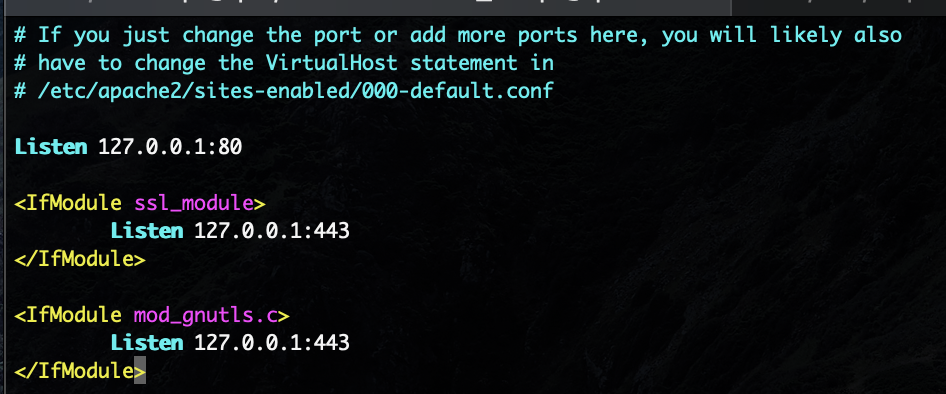
Next I used sftp to copy my website files to /var/www/html on my Pi. The sftp
command can be used just like SSH, we supply the path to our private key. I had to use
sudo chown pi:pi and sudo chmod o+w to allow the pi user to sftp
files
into this location. I used put -R . to recursively copy my website's directory
onto the remote directory on the Pi.
Once I verified that the files copied successfully, I ran
sudo systemctl start apache2 and then
curl http://localhost/index.html
to confirm that the webserver
could serve my website:

Now we are ready to install tor using sudo apt install tor and edit the tor
configuration file to point to our Apache server using sudo vim /etc/tor/torrc:
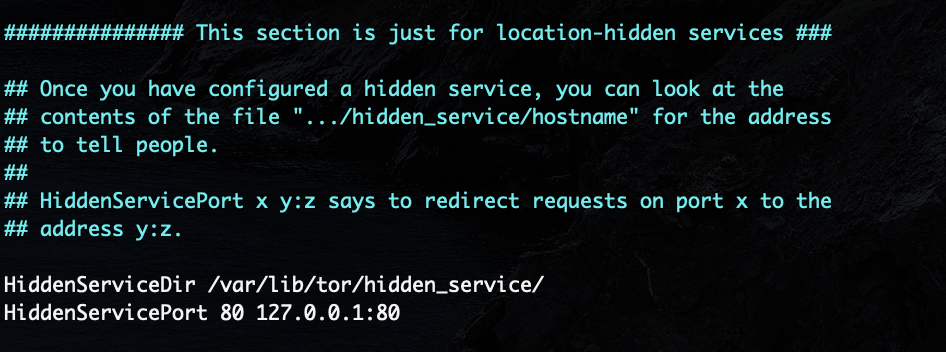
Next step is running tor, this simple command will take care of generating the
private and public keys for the hidden service and registering with the Tor network.
Afterwards we can obtain the hostname of our hidden service by going to
/var/lib/tor/hidden_service. I had to do so as sudo: su then
entered
root password and
I could navigate to the directory and cat the hostname:

Great! I copied that into the Tor Browser and
visited
my website on the Tor network:

Final Touches
The Tor Browser is able to access sites on the clearnet, and there exists a way to inform the browser that a clearnet site has an onion alternative. I've set a head tag on all of the pages of my site to inform the browser of the onion location:
<meta http-equiv="onion-location" content="http://lu26krjctddieqpxyz2mya4j43qjfwsatj7f4uw75svd36bodbt24wid.onion" />

Lastly I wrote a simple script to quickly output the fail2ban logs and list any banned IPs:
#!/bin/bash

cat /var/log/fail2ban.log
echo "BANNED:"
sudo zgrep 'Ban' /var/log/fail2ban.log*

I also wanted to scan my service for any misconfiguration or vulnerabilities. I found a tool on GitHub called onionscan. This tool seemed reputable but didn't appear to be actively maintained, with 14 unmerged pull requests over the past three years. I gave it a try:

Digging around the Issues section of the repository I learned that onionscan didn't support V3 onion addresses. I modified a validation function to support both:
                        func IsOnion(identifier string) bool {
                            // TODO: At some point we will want to support i2p
                            log.Println("NEW VALIDATOR LOGIC USED")
                            if len(identifier) >= 22 && strings.HasSuffix(identifier, ".onion") {
                                isv2url, _ := regexp.MatchString(`(^|\.)[a-z2-7]{16}\.onion$`, identifier)
                                isv3url, _ := regexp.MatchString(`(^|\.)[a-z2-7]{56}\.onion$`, identifier)
                                return isv2url || isv3url
                            }
                            return false
                        }
Note that V2 addresses have 16 unique characters, whereas V3 have 56. I modified the regex to
validate both. I also updated some configuration to match the specific port that the Tor
proxy was bound to on my machine.
Find the working code here.


The findings show that some images used on my site contain EXIF metadata which be used to deanonymize the person(s) involved with an onion site.
Lastly, I installed and ran lynis,
a security scanning tool that audits the system it runs on (as opposed to external scanners
like
Nessus or OpenVAS):
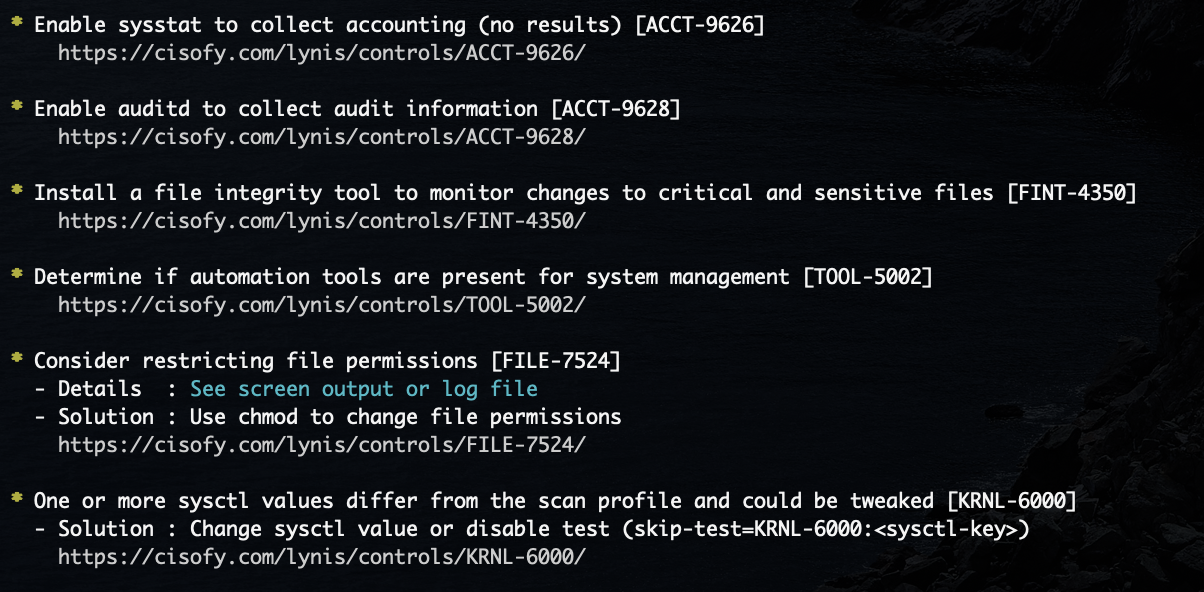
That's it for now! I look forward to making the configuration changes as suggested and
exploring
new ways
to validate the security of my basic onion service.